1. Муқаддима
Thank you for choosing the COUGAR MX360 RGB Mid Tower Case. This manual provides essential information for the proper installation, operation, and maintenance of your new PC case. The MX360 RGB combines a sleek design with ARGB LED strips on the front panel, offering excellent cooling performance and support for a wide range of components, including up to a 360mm radiator, 315mm graphics cards, and 170mm CPU coolers. Its compact layout and full-length PSU shroud contribute to a clean and organized build.
2. Маълумот оид ба бехатарӣ
- Пеш аз насб кардан ё хориҷ кардани ҳама ҷузъҳо ҳамеша қувваи барқро аз васлаки деворӣ ҷудо кунед.
- Handle components with care to avoid damage from static electricity. Consider using an anti-static wrist strap.
- Қисмҳои хурд ва винтҳоро аз кӯдакон дур нигоҳ доред.
- Барои пешгирӣ аз гармии аз ҳад зиёд, вентилятсияи дурусти атрофи корпусро таъмин кунед.
- Кӯшиш накунед, ки корпус ё қисмҳои онро тағир диҳед, зеро ин метавонад кафолати шуморо бекор кунад ва хатари бехатариро ба вуҷуд орад.
3. Мундариҷаи баста
Лутфан тасдиқ кунед, ки ҳамаи ҷузъҳои зерин ба бастаи шумо дохил карда шудаанд:
- COUGAR MX360 RGB Mid Tower Парвандаи
- Қуттии лавозимот (дорои винтҳо, қулфҳои мустаҳкам, бандҳои кабелӣ ва ғайра)
- Дастури корбар (ин ҳуҷҷат)
4. Маҳсулот ба охир расидview
The COUGAR MX360 RGB case features a minimalist design with integrated ARGB lighting and a tempered glass side panel for showcasing сохтори шумо.

Расми 4.1: Тарафи пеш view of the COUGAR MX360 RGB case, showing the interior and active RGB lighting.
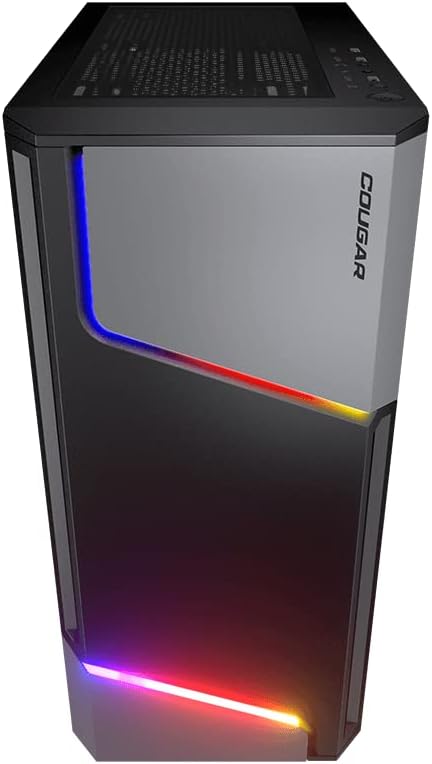
Расми 4.2: Пеш view of the COUGAR MX360 RGB case, highlighting the integrated ARGB LED strips.
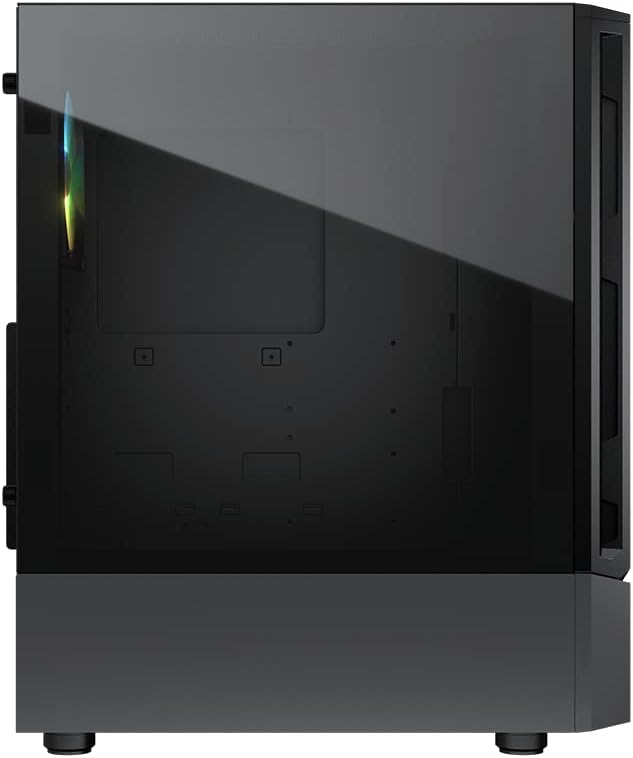
Расми 4.3: Тараф view of the COUGAR MX360 RGB case, featuring the tempered glass panel.

Расми 4.4: Пеши кунҷӣ view of the COUGAR MX360 RGB case, showcasing its design and ARGB elements.
5. Танзим ва насб
Follow these steps to install your components into the COUGAR MX360 RGB case.
5.1 Омода кардани парванда
- Қуттиро дар сатҳи ҳамвор ва устувор ҷойгир кунед.
- Remove the tempered glass side panel by unscrewing the thumb screws at the rear of the case and carefully sliding the panel off.
- Remove the opposite metal side panel by unscrewing the thumb screws and sliding it off.
5.2 Насби motherboard
- Сипари вуруд/хуруҷро (агар он дар motherboard-и шумо пешакӣ насб нашуда бошад) дар сӯрохи қафои корпус насб кунед.
- Ensure the correct standoffs are installed for your motherboard form factor (ATX, Micro-ATX, Mini-ITX). Adjust or add standoffs as needed.
- Модари худро бодиққат ба стендҳо ҷойгир кунед ва сӯрохиҳои винтро мувофиқ кунед.
- Модераторро бо винтҳои додашуда мустаҳкам кунед.
5.3 Насби воҳиди таъминоти барқ (PSU)
- Locate the PSU shroud at the bottom of the case.
- Қувваи барқи худро аз қафои корпус ба қисмати махсуси мувофиқ лағжонед.
- PSU-ро бо винтҳо аз пушти корпус мустаҳкам кунед.
- Route necessary cables through the cutouts in the PSU shroud for cable management.
5.4 Насби диски нигаҳдорӣ
The MX360 RGB supports various storage configurations.
- Дискҳои сахти 3.5 дюймӣ: Install into the drive cage located under the PSU shroud.
- 2.5" SSDs/HDDs: Mount onto the dedicated trays or mounting points behind the motherboard tray.
5.5 Насби корти графикӣ (GPU).
- Сарпӯшҳои зарурии ковокии PCIe-ро аз паси парванда хориҷ кунед.
- Корти графикаи худро ба ковокии мувофиқи PCIe дар motherboard ҷойгир кунед.
- Secure the graphics card with screws. The case supports graphics cards up to 315mm in length.
5.6 Насби системаи хунуккунӣ (вентиляторҳо/радиаторҳо)
The case supports up to six fans and a 360mm water cooling radiator.
- Пеш: Supports up to 3 x 120mm or 2 x 140mm fans, or a 240/280/360mm radiator.
- боло: Supports up to 2 x 120mm or 2 x 140mm fans, or a 240/280mm radiator.
- Қафо: 1 х 120 мм мухлиси дастгирӣ мекунад.
Install fans or radiators using the provided screws, ensuring proper airflow direction.
5.7 Пайвастшавӣ ба панели пеши
Connect the front panel cables (USB, Audio, Power, Reset, LED) to their corresponding headers on your motherboard. Refer to your motherboard manual for exact header locations.
5.8 ARGB Lighting Connection
The integrated ARGB LED strips on the front panel connect via a 5V/3Pin ARGB connector. Connect this cable to a compatible 5V/3Pin ARGB header on your motherboard to synchronize lighting effects with your system.
6. Идоракунии парванда
Once all components are installed and connected, replace the side panels. Power on your system using the power button on the top I/O panel. The ARGB lighting will illuminate, controlled by your motherboard's software or a dedicated ARGB controller if you have one installed.
7. Нигоҳдорӣ
Нигоҳдории мунтазам кӯмак мекунад, ки кори беҳтарин ва дарозмуддати ҷузъҳои компютери шумо таъмин карда шавад.
- Филтрҳои чанг: The MX360 RGB includes removable dust filters (e.g., top, bottom). Periodically remove and clean these filters with compressed air or water (ensure they are completely dry before reinstallation).
- Тозакунии дохилӣ: Use compressed air to remove dust from internal components like fans, heatsinks, and the motherboard.
- Тозакунии берунӣ: Сатҳи беруниро бо нарм пок кунед, гamp матоъ. Аз тозакунандаи абразивӣ худдорӣ кунед.
8. Баррасии мушкилот
Агар шумо бо мушкилот рӯ ба рӯ шавед, ба қадамҳои маъмулии ҳалли мушкилот муроҷиат кунед:
- Не қудрат: Ensure all power cables (24-pin ATX, 8-pin CPU, GPU power) are securely connected. Check the PSU switch is in the 'ON' position. Verify front panel power button connection to the motherboard.
- Равшании ARGB кор намекунад: Confirm the 5V/3Pin ARGB connector is correctly plugged into a compatible motherboard header. Check your motherboard's RGB software for control settings.
- Аз ҳад зиёд гармшавӣ: Ensure all case fans are spinning and oriented correctly for optimal airflow. Check for dust buildup on filters and components. Verify CPU cooler and GPU cooler are properly installed.
- Пайвастҳои суст: Re-seat all components (RAM, GPU, storage drives) and check all power and data cables.
9. Мушаххасоти
| Хусусият | Мушаххасоти |
|---|---|
| Бренд | КУГАР |
| Номи модел | MX360 RGB |
| Рақами модели ашё | CGR-5CC6G-RGB |
| Навъи парванда | Мандарин |
| Андозаҳо (LxWxH) | 14.88 x 8.27 x 18.11 инч (378 x 210 x 460 мм) |
| Вазни ашё | 10.56 фунт (4.8 килограмм) |
| Материал | Tempered Glass, Fine Metal |
| Ранги | Сиёҳ |
| Дастгирии motherboard | Мини ITX / Micro ATX / ATX |
| Макс. Дарозии корти графикӣ | 315 мм |
| Макс. Баландии CPU сардтар | 170 мм |
| Дастгирии PSU | Стандарти ATX PS2 |
| Усули хунуккунӣ | Ҳаво / Об |
| Дастгирии радиатор | Front: 360mm / 280mm / 240mm / 140mm / 120mm Top: 280mm / 240mm / 140mm / 120mm Қафо: 120мм |
| Дастгирии мухлисон | Пеш: 3 x 120mm / 2 x 140mm боло: 2 х 120мм / 2 х 140мм Пушт: 1 x 120mm |
| Drive Bays | 3.5" HDD: 2 2.5" SSD: 2+2 (converted from 3.5" drive bays) |
| Панели вуруд / баромад | USB 3.0 x 2, USB 2.0 x 1, Mic x 1, Audio x 1, RGB Button |
| Хусусияти махсус | ARGB LED Strips, Full-length PSU Cover for Cable Hiding and Improved Airflow |
10. Кафолат ва дастгирӣ
COUGAR products are designed and manufactured to the highest quality standards. For warranty information, please refer to the warranty card included with your product or visit the official COUGAR webсайт. Барои даъвоҳои кафолат далели хариди худро нигоҳ доред.
For technical support or further assistance, please visit the official COUGAR website or contact their customer service department. You can find more information and resources on the COUGAR Store on Amazon.