Муқаддима
This manual provides essential information for the safe and efficient operation of your SCULPFUN S9 PRO 10W Laser Engraver. The S9 PRO features 10W laser beam shaping technology, offering a 0.06mm ultra-fine laser focus for strong cutting penetration and precision. It is capable of cutting materials such as 15mm thick wood and 10mm acrylic, and engraving ceramics and stainless steel. Please read this manual thoroughly before use to ensure proper setup, operation, and maintenance.

Маълумот оид ба бехатарӣ
Operating a laser engraver involves potential hazards. Adhere to all safety guidelines to prevent injury or damage.
- Муҳофизати чашм: Always wear appropriate laser safety glasses when operating the machine. The integrated laser filter on the S9 PRO blocks 98% of ultraviolet light, allowing observation without additional safety glasses for bystanders, but direct laser exposure should always be avoided.
- Калиди барқ: The machine is equipped with a secure power switch. Always turn off the machine when not in use or during maintenance.
- Ҷойгиркунии бехатар: Utilize the fastening holes on the four feet and frame structure to secure the machine and data cables, preventing accidental movement.
- Муҳофизати рӯизаминӣ: Use the provided A4-sized steel pad to protect your work surface from laser damage.
- Вентилятсия: Ensure adequate ventilation in your workspace to dissipate fumes produced during engraving and cutting.
- Маводҳои оташгиранда: Do not engrave or cut highly flammable materials without proper precautions.
- Кӯдакон ва ҳайвоноти хонагӣ: Keep children and pets away from the operating area. The laser point can attract attention, but direct exposure is dangerous.

Мундариҷаи баста
Боварӣ ҳосил кунед, ки ҳамаи ҷузъҳо ҳангоми кушодан мавҷуданд:
- 1 x SCULPFUN S9 Pro 10 W Laser Engraver
- A4-sized steel pad
- Адаптери барқ
- Сими USB
- Воситаҳои васлкунӣ
- Дастури корбар (ин ҳуҷҷат)
Дастури насб
1. Маҷлис
The SCULPFUN S9 PRO features a fast assembly design, allowing for installation typically within 10 to 20 minutes. Follow the steps below:
- Қадами 1: Assemble the main frame components.
- Қадами 2: Attach the X-axis and laser module to the frame.
- Қадами 3: Ҳамаи кабелҳои заруриро пайваст кунед.
- Анҷом: Боварӣ ҳосил кунед, ки ҳамаи пайвастҳо мустаҳкаманд ва чаҳорчӯба устувор аст.
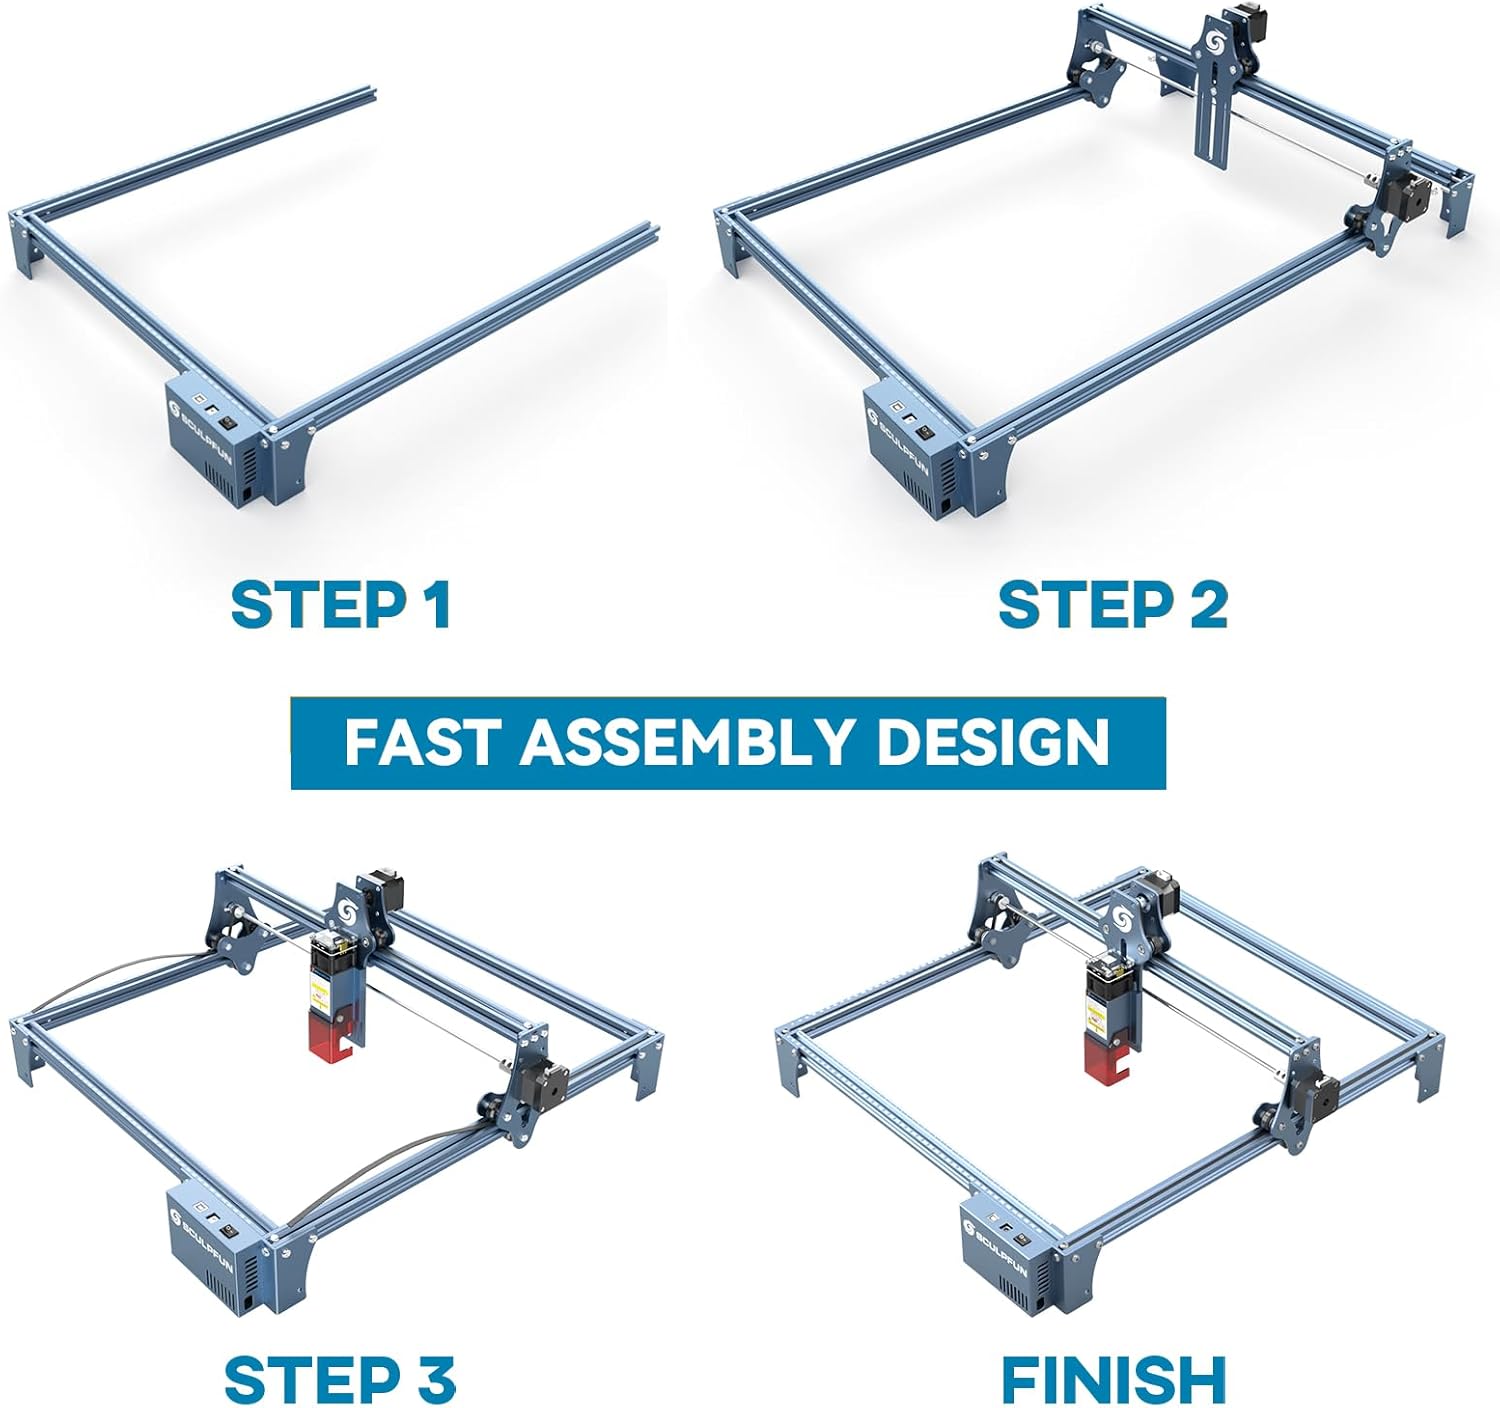
The full-metal structure enhances robustness and engraving accuracy. The X and Y axes include precise scale lines, forming a rectangular measuring ruler for quick object sizing.


2. Танзими фокус
The S9 PRO features a quick fixed-focus design. The laser combines a fixed-focus lens with a sliding design for easy adjustment.
- Place the laser module over your material.
- Move the laser module up or down until the focus is achieved.
- Tighten the screws to secure the laser module in place.

Дастурҳои амалиётӣ
1. Мутобиқати нармафзор
The SCULPFUN S9 PRO is compatible with various advanced engraving software:
- LaserGRBL (Windows)
- LightBurn (Windows, macOS, Linux)
- Benbox
- GrblController
- LiteFire
It supports engraving in PWM mode and various file formats including JPG, PNG, DXF, SVG, AI, G-code, NC, and BMP.

2. Material Capabilities
The 10W laser module provides strong cutting and engraving capabilities across a wide range of materials:
- Буридани: Up to 15mm thick wood, 10mm black acrylic.
- Гравюра: Wood, leather, ceramics, stainless steel, aluminum oxide, PCB board, paper, cardboard, dark stone, and more.


3. General Operation Workflow
- Тарҳрезӣ: Create or import your design using compatible software (e.g., LightBurn, LaserGRBL).
- Ҷойгиркунии мавод: Place your material on the work surface, ensuring it is flat and secure. Use the integrated rulers for precise positioning.
- Танзими фокус: Adjust the laser focus as described in the Setup section.
- Танзимоти нармафзор: Configure laser power, speed, and passes in your chosen software according to the material and desired effect. Refer to software documentation for detailed settings.
- Оғози амалиёт: Раванди кандакорӣ ё буриданро аз нармафзор оғоз кунед. Ҳангоми кор дастгоҳро назорат кунед.
- Анҷом: Once the process is complete, turn off the machine and carefully remove your finished piece.
Нигоҳдорӣ
Regular maintenance ensures optimal performance and extends the lifespan of your SCULPFUN S9 PRO.
- Clean the Laser Lens: Periodically clean the laser lens with a soft, lint-free cloth and lens cleaning solution to maintain laser precision.
- Clean the Work Area: Remove debris and dust from the engraving area after each use to prevent interference with machine movement.
- Inspect Belts and Rails: Check the drive belts for tension and wear. Keep the guide rails clean and lubricated if necessary to ensure smooth movement of the laser module.
- Навсозии нармафзор: Check the official SCULPFUN website for any available firmware updates to ensure your machine has the latest features and improvements.
Мушкилкушо
Ин бахш мушкилоти умумиеро, ки шумо метавонед дучор ояд, баррасӣ мекунад.
- Лазер намегирад:
- Check if the power cable is securely connected and the power switch is on.
- Verify that the USB cable is connected to your computer and the machine.
- Ensure the software is correctly configured and sending commands.
- Check the laser module connection.
- Сифати кандакорӣ/буриш:
- Re-check the laser focus. An incorrect focus is a common cause of poor quality.
- Adjust laser power and speed settings in your software. Different materials require different settings.
- Боварӣ ҳосил кунед, ки мавод ҳамвор ва боэътимод ҷойгир карда шудааст.
- Агар линзаи лазерӣ ифлос ба назар расад, онро тоза кунед.
- Machine Not Moving Correctly:
- Check for any obstructions on the rails or belts.
- Ensure belts are properly tensioned and not slipping.
- Verify that all cables are securely connected.
- Restart the software and the machine.
- Масъалаҳои пайвасти нармафзор:
- Ensure the correct COM port is selected in your software.
- Try restarting your computer and the engraver.
- Reinstall the software or drivers if necessary.
For persistent issues, refer to the SCULPFUN support webсайт ё бо хидмати мизоҷон тамос гиред.
Мушаххасоти
| Бренд | SCULPFUN |
| Рақами модел | S9PRO10W-ELE |
| Қувваи лазерӣ | 10W (Diode Laser) |
| Фокуси лазерӣ | 0.06mm (Ultrafine) |
| Аниқии кандакорӣ | 0.01мм |
| Майдони кандакорӣ | 400 х 410 мм |
| Манбаи нерӯ | AC |
| Андозаҳои бастаҳо | 61.79 х 38.4 х 13.4 см |
| Вазни баста | 4.95 кг |
| Компонентҳои дохилшуда | 1 x SCULPFUN S9 Pro 10 W laser engraver |
| Мутобиқати нармафзор | LaserGRBL, LightBurn, Benbox, GrblController, LiteFire |
| OS дастгирӣ карда мешавад | Windows, macOS, Linux |
| Дастгир карда шудааст File Форматҳо | JPG, PNG, DXF, SVG, AI, G-code, NC, BMP |
Кафолат ва дастгирӣ
For warranty information, technical support, or service inquiries, please contact SCULPFUN customer support through their official webсайт ё фурӯшандае, ки маҳсулот харида шудааст. Квитансияи хариди худро ҳамчун далели харид нигоҳ доред.
Истеҳсолкунанда: SCULPFUN
Аввалин санаи дастрас: 29 ноябри соли 2024