1. Муқаддима
This manual provides detailed instructions for the installation, operation, and maintenance of your darkFlash DS900 Air ATX Mid-Tower PC Gaming Case. Please read this manual thoroughly before beginning assembly to ensure proper setup and safe usage. The DS900 Air is designed to offer a clear view of your components with its 270° full-view tempered glass and provides excellent cooling capabilities for high-performance systems.

Figure 1.1: darkFlash DS900 Air ATX Mid-Tower PC Gaming Case with internal components and RGB lighting.
2. Маълумот оид ба бехатарӣ
Ҳангоми насб ва истифода ҳамеша чораҳои бехатарии зеринро риоя кунед:
- Пеш аз насб кардан ё хориҷ кардани ҳама ҷузъҳо қувваи барқро аз васлаки деворӣ ҷудо кунед.
- Барои пешгирии зарари разряди электростатикӣ (ESD) ба ҷузъҳои ҳассос тасмаи дастони антистатикӣ пӯшед.
- Handle tempered glass panels with care. Avoid impacts or dropping them, as they can shatter.
- Қисмҳои хурд ва винтҳоро аз кӯдакон дур нигоҳ доред.
- Барои пешгирӣ аз гармии аз ҳад зиёд, вентилятсияи дурусти атрофи корпусро таъмин кунед.
- Do not attempt to modify the case structure, as this may void the warranty and pose safety risks.
3. Мушаххасоти
| Хусусият | Мушаххасоти |
|---|---|
| Номи модел | DS900 Air |
| Навъи парванда | ATX Mid-Tower |
| Дастгирии motherboard | ATX, Micro ATX, Mini ITX |
| Тозакунии дарозии GPU | То 425мм |
| Тозакунии баландии CPU Cooler | То 170мм |
| Навъи PSU | ATX (Bottom-mounted) |
| Drive Bays | 2x 3.5" HDD or 2x 2.5" SSD, 2x 2.5" SSD |
| Ҷойҳои васеъ | 7 ҷойи PCIe |
| Портҳои воридотӣ / баромад | 1x USB-C, 1x USB 3.0, Audio (HD Audio) |
| Дастгирии мухлисон | Bottom: 3x 120mm; Top: 3x 120mm or 2x 140mm; Rear: 1x 120mm; Right Side: 2x 120mm |
| Дастгирии радиатор | Top: Up to 360mm; Side: Up to 240mm |
| Материалхо | Пӯлод, шишаи мулоимшуда |
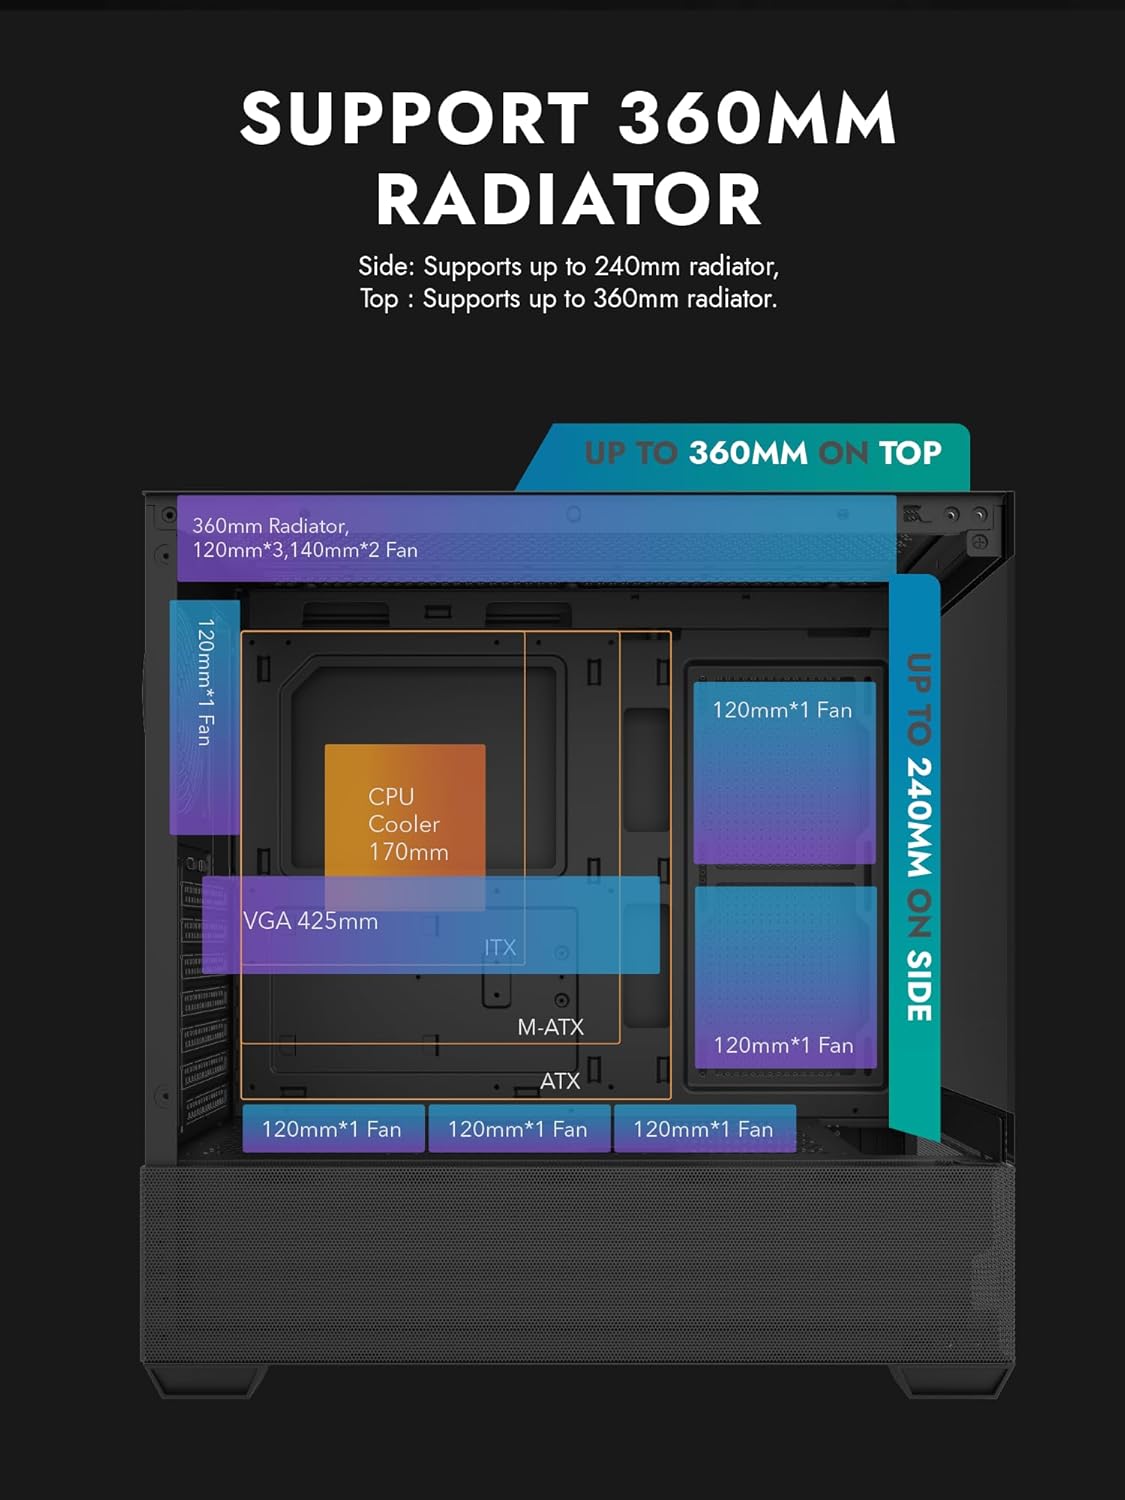
Figure 3.1: Radiator and fan support diagram for the DS900 Air case, illustrating maximum component dimensions.
4. Танзим ва насб
Follow these steps to assemble your PC components within the darkFlash DS900 Air case.
4.1. Омодасозии парванда
- Панелҳои паҳлӯро хориҷ кунед: The DS900 Air features a tool-free clamshell side panel. Gently pull the top edge of the tempered glass side panel to unlatch it, then lift it off. Repeat for the other side panel if necessary.
- Қуттии лавозимот: Locate the accessory box inside the case, which contains screws, cable ties, and other mounting hardware.
4.2. Насб кардани плата
- Сипари вуруд/хуруҷро дар сӯрохи қафои корпус насб кунед.
- Align your ATX, Micro-ATX, or Mini-ITX motherboard with the standoffs inside the case. Ensure the I/O ports align with the I/O shield.
- Бо истифода аз иддао додашуда motherboard-ро мустаҳкам кунед.
4.3. Насби воҳиди таъминоти барқ (PSU).
- The DS900 Air has a dedicated bottom PSU chamber. Slide your ATX power supply into the chamber from the rear of the case.
- PSU-ро бо винтҳо аз пушти корпус мустаҳкам кунед.
- Route necessary power cables through the cutouts into the main compartment.
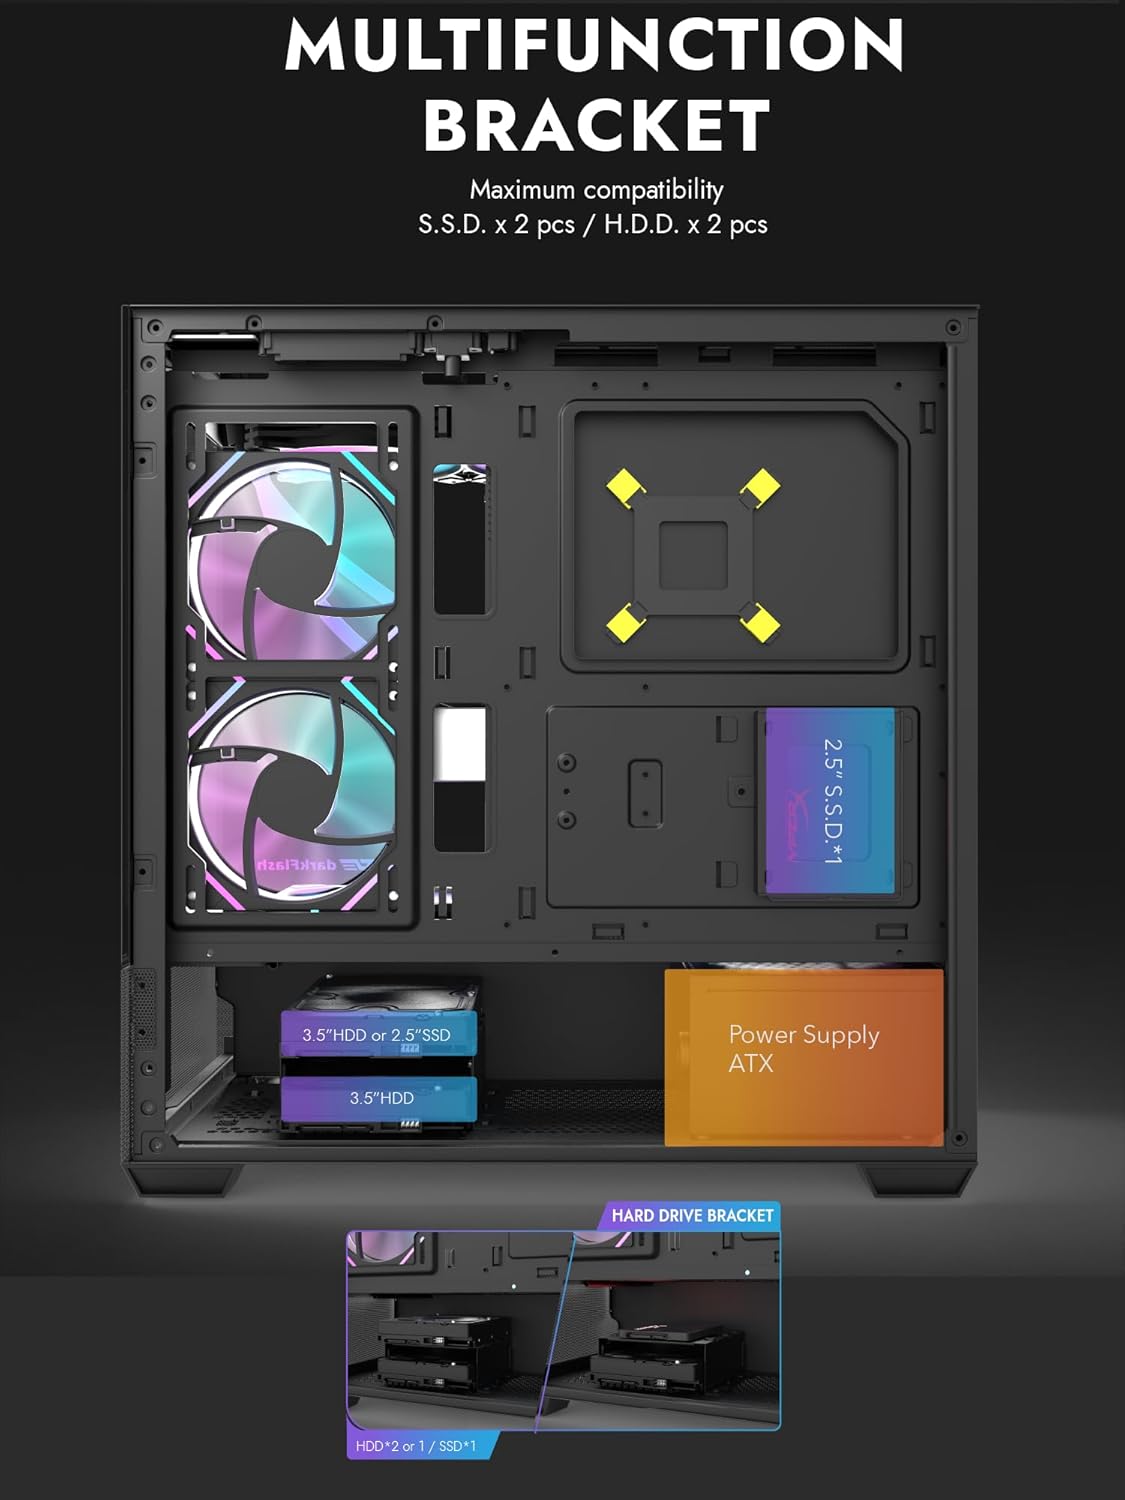
Figure 4.1: Internal layout showing the multifunction drive bracket and the bottom-mounted PSU chamber.
4.4. Насби дастгоҳи нигаҳдорӣ
The case supports up to two 3.5" HDDs or 2.5" SSDs in the hard drive bracket, and two additional 2.5" SSDs on the multifunction bracket.
- HDD 3.5" / SSD 2.5": Install drives into the removable hard drive bracket located in the PSU chamber. Secure with screws.
- SSD 2.5 дюйм: Mount 2.5" SSDs onto the multifunction bracket located on the motherboard tray. Secure with screws.
4.5. Насби корти графикӣ (GPU).
- Сарпӯшҳои зарурии ковокии PCIe-ро аз паси парванда хориҷ кунед.
- Корти графикаи худро ба ковокии мувофиқи PCIe дар motherboard ҷойгир кунед.
- Secure the graphics card with screws. The case supports GPUs up to 425mm in length.
4.6. Насби системаи хунуккунӣ (вентиляторҳо/радиаторҳо)
The DS900 Air offers extensive cooling options:
- боло: Supports up to 3x 120mm fans or 2x 140mm fans, or a 360mm radiator.
- Поён: Supports up to 3x 120mm fans.
- Қафо: 1x вентиляторҳои 120 мм-ро дастгирӣ мекунад.
- Тарафи рост: Supports 2x 120mm fans or a 240mm radiator.
Install fans and radiators using the appropriate screws and mounting points. Ensure correct airflow direction for optimal cooling.

Figure 4.2: Fan support locations and quantities within the DS900 Air chassis.

Figure 4.3: Airflow diagram demonstrating optimal cooling paths through the case.
4.7. Connecting Front I/O Cables
Connect the front panel cables (USB-C, USB 3.0, HD Audio, Power, Reset, LED) to their corresponding headers on your motherboard. Refer to your motherboard manual for exact header locations.

Figure 4.4: Top-right I/O panel featuring USB-C and USB 3.0 ports.
4.8. Идоракунии кабел
Барои идоракунии ноқилҳо буришҳои масири кабел ва нуқтаҳои пайвасткуниро дар паси табақи motherboard истифода баред. Ин ҷараёни ҳаво ва эстетикаро беҳтар мекунад.
5. Идоракунии компютери шумо
Once all components are installed and cables are connected, replace the side panels. Connect your monitor, keyboard, mouse, and power cable. Press the power button on the case to start your system. Ensure all fans are spinning and components are receiving power.
6. Нигоҳдорӣ
Нигоҳдории мунтазам кӯмак мекунад, ки кори беҳтарин ва дарозмуддати ҷузъҳои компютери шумо таъмин карда шавад.
- Тоза кардани хок: Periodically clean dust filters and internal components using compressed air. The DS900 Air features mesh panels that help filter dust.
- Равиши ҳаво: Ensure no obstructions block the intake or exhaust vents of the case.
- Идоракунии кабелӣ: Re-evaluate cable routing periodically to ensure no cables are interfering with fan blades or airflow.
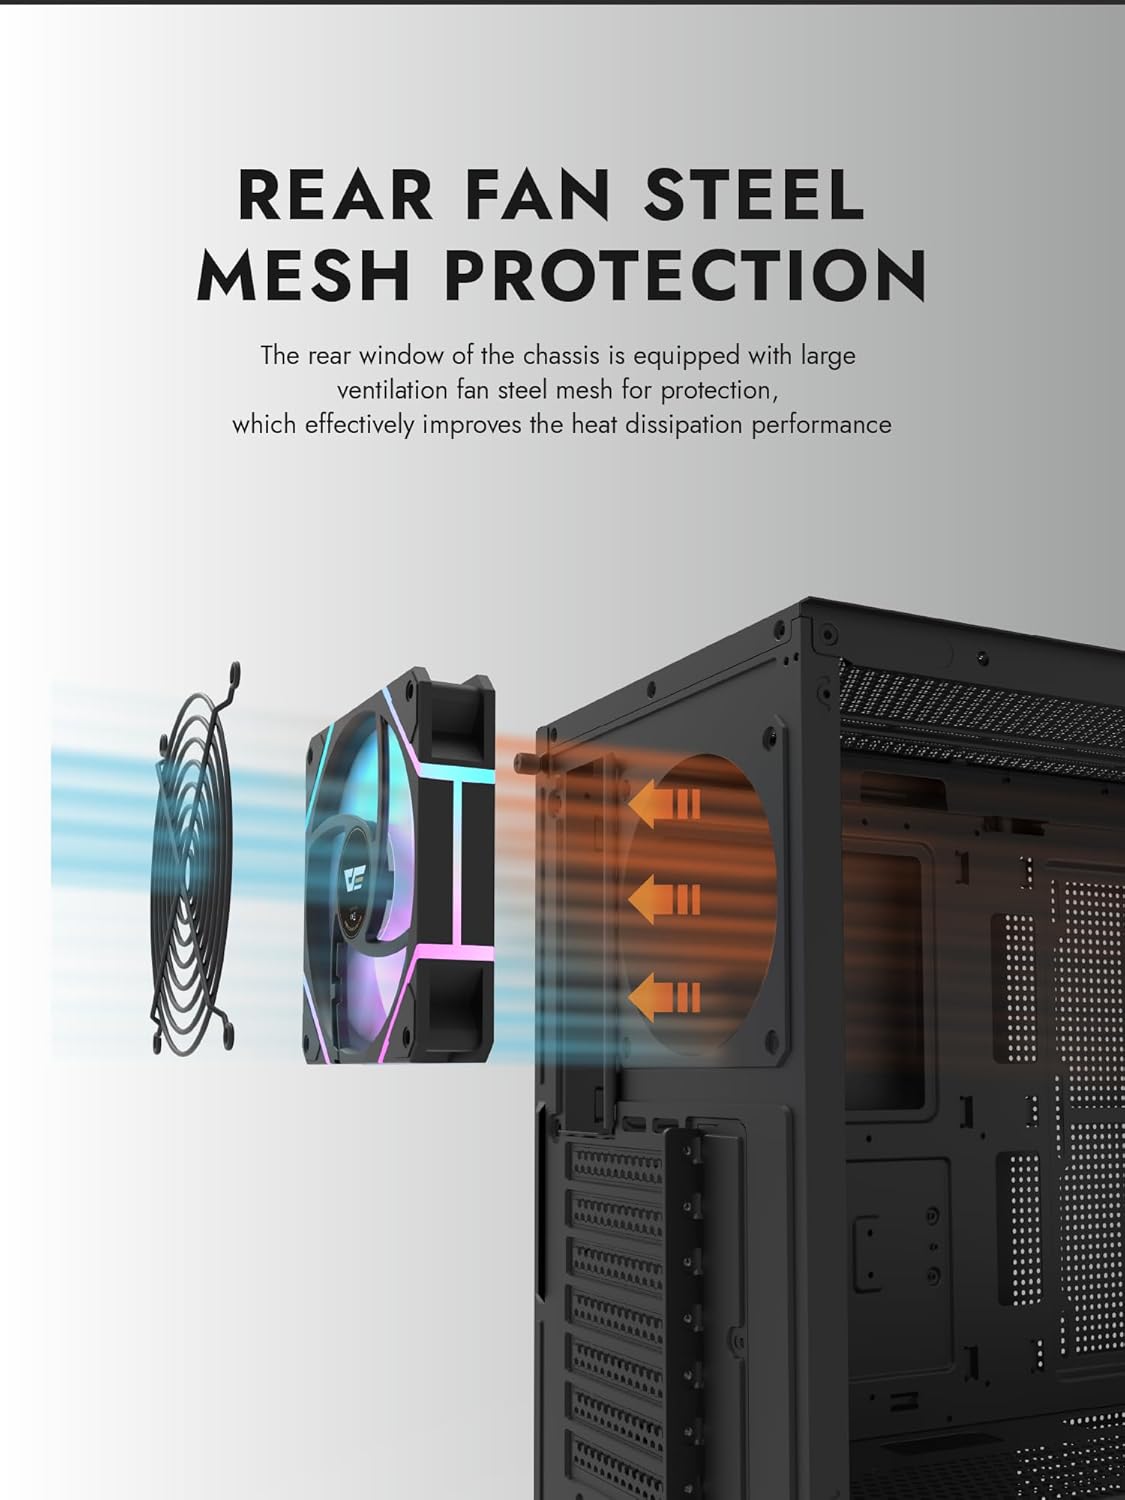
Figure 6.1: Rear fan steel mesh protection, designed to improve heat dissipation.
7. Баррасии мушкилот
If you encounter issues with your PC build, consider the following common troubleshooting steps:
- Не қудрат: Check all power connections, including the PSU to the wall, PSU to motherboard, and front panel power switch cable to the motherboard.
- Намоиши: Ensure your monitor is connected to the graphics card (not the motherboard I/O unless using integrated graphics). Reseat the graphics card and RAM.
- Аз ҳад зиёд гармшавӣ: Verify all fans are spinning correctly and are oriented for proper airflow. Check CPU cooler installation.
- Компонент ошкор нашудааст: Reseat the component (e.g., RAM, GPU, storage drive) and check its power and data connections.
8. Кафолат ва дастгирӣ
darkFlash products are manufactured to high-quality standards. For warranty information or technical support, please refer to the official darkFlash webсайт ё фурӯшандаи худ тамос гиред. Барои даъвоҳои кафолат далели хариди худро нигоҳ доред.