1. Муқаддима
This manual provides detailed instructions for the installation, configuration, and maintenance of your ASRock G41C-VS motherboard. Please read this manual thoroughly before installing the motherboard to ensure proper setup and operation. This motherboard supports Intel Core 2 Extreme, Core 2 Quad, Core 2 Duo, Pentium Dual Core, and Celeron processors with an LGA 775 socket, and features both DDR2 and DDR3 memory support.
2. Танзим ва насб
2.1 Тарҳбандии motherboard
Familiarize yourself with the components and connectors on the motherboard before proceeding with installation.
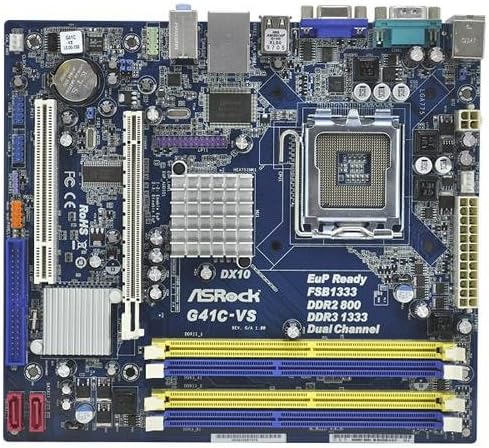
Тасвири 1: Барview of the ASRock G41C-VS motherboard, showing the CPU socket, memory slots, expansion slots, and various connectors.
2.2 Processor (CPU) Installation
The ASRock G41C-VS motherboard uses an LGA 775 socket. Follow these steps to install your compatible Intel processor:
- Дар motherboard васлаки LGA 775 CPU ҷойгир кунед.
- Gently push down the load lever and pull it to the side to open the socket retention frame.
- CPU-ро бодиққат бо васлкунак ҳамоҳанг созед ва боварӣ ҳосил кунед, ки секунҷаи тиллоии CPU бо секунҷаи васлкунак мувофиқат мекунад. CPU-ро ба васлкунак маҷбур накунед.
- Lower the CPU into the socket.
- Close the retention frame and secure it by pushing the load lever back into its locked position.
- Apply a thin layer of thermal paste to the CPU surface, then install the CPU cooler according to its manufacturer's instructions.
2.3 Насбкунии хотира (RAM).
This motherboard supports both DDR2 and DDR3 memory modules. It features two DDR2 DIMM slots and two DDR3 DIMM slots, supporting dual channel memory architecture.
- Клипҳоро дар ҳар ду канори ковокии DIMM кушоед.
- Модули хотираро бо слот ҳамоҳанг созед ва боварӣ ҳосил кунед, ки хати модул ба калиди слот мувофиқат мекунад.
- Ҳарду канори модули хотираро сахт зер кунед, то он даме ки клипҳо ба ҷои худ ҷойгир шаванд.
- Ensure both clips are fully closed and the module is securely seated.
2.4 Насби корти васеъкунӣ
The motherboard includes one PCI-Express x16 slot for graphics cards and one PCI slot for other expansion cards.
- Locate the desired expansion slot.
- Remove the corresponding metal bracket from your PC case.
- Корти васеъкуниро бо слот мувофиқ кунед ва то он даме ки пурра ҷойгир шавад, сахт зер кунед.
- Кортро бо винт ба корпуси компютер маҳкам кунед.
2.5 Пайваст кардани таҷҳизоти канорӣ ва барқ
Connect all necessary cables to the motherboard:
- Пайвасткунакҳои барқ: Connect the 24-pin ATX power connector and the 4-pin ATX 12V power connector from your power supply unit (PSU) to the motherboard.
- Дастгоҳҳои SATA: Connect your SATA hard drives or SSDs to the SATA ports on the motherboard using the provided SATA data cables.
- Пайвасткунакҳои панели пеши: Connect the power switch, reset switch, power LED, and HDD LED cables from your PC case to the front panel header on the motherboard. Refer to the motherboard diagram for correct pin assignments.
- Портҳои USB: Connect internal USB headers for front panel USB ports. Connect external USB devices to the rear USB 2.0 ports.
- Аудио: Connect front panel audio cables to the appropriate header. Connect speakers or headphones to the rear audio jacks.
- Видео: Connect your monitor to the VGA port on the rear I/O panel if using integrated graphics.
- Шабака: Connect an Ethernet cable to the RJ45 LAN port for network access.
3. Дастурҳои истифодабарӣ
3.1 Боркунии ибтидоӣ ва танзимоти BIOS
After completing hardware installation, power on your system. During the initial boot sequence, you can access the BIOS (Basic Input/Output System) setup utility by pressing the ДЕЛ key (or as indicated on screen).
- Танзимоти BIOS: Configure boot order, date and time, and other system parameters as needed. Save changes before exiting the BIOS.
- Насби системаи оператсионӣ: Install your preferred operating system from a bootable USB drive or optical disc.
3.2 Насби драйверҳо
For optimal performance and stability, install the necessary drivers for your motherboard components. These drivers can be found on the included support CD or downloaded from the official ASRock webсайт.
- Драйверҳои чипсетро насб кунед.
- Install integrated graphics drivers (Intel GMA X4500).
- Драйверҳои аудиоро насб кунед.
- Install LAN drivers.
4. Нигоҳдорӣ
4.1 Тозакунӣ
Барои пешгирӣ аз ҷамъшавии чанг, ки метавонад боиси аз ҳад зиёд гарм шудан ва вайрон шудани қисмҳо гардад, дохили компютери худро мунтазам тоза кунед. Барои тоза кардани чанг аз вентиляторҳо, радиаторҳо ва дигар қисмҳо аз ҳавои фишурда истифода баред. Пеш аз тоза кардан, боварӣ ҳосил кунед, ки система хомӯш ва аз шабака ҷудо карда шудааст.
4.2 CMOS Battery Replacement
The motherboard uses a CR2032 lithium coin cell battery to power the CMOS (Complementary Metal-Oxide-Semiconductor) memory, which stores BIOS settings and the system clock. If your system consistently loses time or BIOS settings, the battery may need replacement. Locate the battery holder on the motherboard, gently remove the old battery, and insert a new CR2032 battery with the positive (+) side facing up.
5. Баррасии мушкилот
Ин бахш роҳҳои ҳалли мушкилоти умумӣ, ки шумо метавонед дучор шавед, пешниҳод мекунад.
- Не қудрат: Ensure all power cables (24-pin ATX, 4-pin ATX 12V) are securely connected to the motherboard and PSU. Verify the PSU is switched on and connected to a working power outlet.
- Намоиши: Check that the monitor is properly connected to the VGA port. If using a discrete graphics card, ensure it is correctly seated in the PCI-Express x16 slot and connected to power (if required). Try reseating RAM modules.
- Ноустувории система / садамаҳо: This can be caused by improperly seated RAM, overheating, or outdated drivers. Ensure RAM is correctly installed, CPU cooler is functioning, and all drivers are up-to-date.
- CMOS Reset: If you encounter issues after changing BIOS settings, you can reset the CMOS to default settings. This is typically done by briefly shorting a specific jumper on the motherboard (refer to the motherboard diagram for the CLRCMOS1 jumper) or by removing the CMOS battery for a few minutes.
6. Мушаххасоти
Below are the technical specifications for the ASRock G41C-VS motherboard:
| Компонент | Мушаххасоти |
|---|---|
| Дастгирии коркардкунанда | LGA 775 for Intel Core 2 Extreme, Core 2 Quad, Core 2 Duo, Pentium Dual Core, Celeron Processors |
| Чипсет | Intel G41 + ICH7 |
| Хотира | 2 x DDR2 DIMM slots (DDR2 800/667 non-ECC, un-buffered, max 8GB) 2 x DDR3 DIMM slots (DDR3 1333(OC)/1066/800 non-ECC, un-buffered, max 8GB) Supports Dual Channel Memory Technology |
| Ҷойҳои васеъ | 1 x ковокии PCI Express x16 1 x ковокии PCI |
| Графика | Integrated Intel GMA X4500 Graphics Max. shared memory 1759MB Supports DirectX 10, Pixel Shader 4.0 |
| Нигоҳдорӣ | Пайвасткунакҳои 4 x SATA2 3.0 Гб/с |
| Аудио | 5.1 CH HD Audio (VIA VT1705 Audio Codec) |
| LAN | PCIE x1 Gigabit LAN 10/100/1000 Mb/s (Realtek RTL8111DL) |
| Платформаи қафо I / O | 1 x Порти муши PS/2 1 x Порти клавиатураи PS/2 1 x Порти силсилавӣ: COM1 1 x VGA Port 4 x портҳои USB 2.0 1 х RJ-45 Порти LAN бо LED Jacks аудио HD: Хати дар / баландгӯяк пеши / Микрофон |
| Пайвасткунакҳои дохилӣ | 2 x USB 2.0 Headers (support 4 USB 2.0 ports) 1 x Пайвасткунаки мухлиси CPU 1 x Chassis Fan Connector 1 x 24 PIN ATX Connector Power 1 x 4 pin 12V Connector Power 1 x Пайвасткунаки аудиои панелӣ 1 x SPDIF Out Header 1 x Clear CMOS Jumper |
| Формаи форма | Micro ATX Form Factor (8.9-in x 7.5-in, 22.6 cm x 19.1 cm) |
| Андозаҳои маҳсулот | 8.8 x 7.8 x 1.9 инч |
| Вазни ашё | 1.81 фунт |
7. Мундариҷаи баста
The ASRock G41C-VS motherboard package typically includes the following items:
- ASRock G41C-VS Motherboard
- Дастур оид ба насби зуд
- CD-и дастгирӣ (барои драйверҳо ва хидматҳо)
- I / O Shield
- 2 x кабелҳои маълумотии SATA
8. Дастгирӣ ва кафолат
For technical support, driver updates, and further information, please visit the official ASRock website. Warranty terms and conditions are subject to regional policies and can be found on the ASRock support page or by contacting your local retailer.
For additional assistance, you may refer to the ASRock support resources available online.


