1. Муқаддима
This manual provides essential instructions for the safe and efficient operation, setup, and maintenance of your Festool OFK 700 EQ-Plus Edge Milling Machine. Please read this manual thoroughly before using the machine to ensure proper handling and to prevent injury or damage.

Figure 1: Festool OFK 700 EQ-Plus Edge Milling Machine and included accessories, neatly organized in a Systainer SYS 2 T-LOC case.
2. Маълумот оид ба бехатарӣ
Ҳангоми кор бо асбобҳои барқӣ ҳамеша қоидаҳои умумии бехатариро риоя кунед. Риоя накардани ин дастурҳо метавонад боиси зарбаи барқ, сӯхтор ва/ё ҷароҳати ҷиддӣ гардад.
- Таҷҳизоти дахлдори муҳофизати инфиродӣ (PPE), аз ҷумла муҳофизати чашм, муҳофизати шунавоӣ ва ниқобҳои чангиро пӯшед.
- Боварӣ ҳосил кунед, ки порчаи корӣ бехатар аст clamped before milling.
- Keep hands and body parts clear of the milling cutter during operation.
- Disconnect the machine from the power supply before making any adjustments, changing accessories, or performing maintenance.
- Use the dust extraction connection to minimize dust exposure.
- Мошинро дар дamp ё шароити тар.
3. Қисмҳо ва мундариҷаи бастаҳо
The Festool OFK 700 EQ-Plus Edge Milling Machine comes with the following standard accessories:
- OFK 700 EQ-Plus Edge Milling Machine
- Clamp Ø 8мм
- Сарпӯши соркунанда
- Flush cutter D 19 x 16
- Service Tools (e.g., wrench for cutter change)
- SYSTAINER SYS 2 T-LOC case for storage and transport

Расми 2: Тараф view of the OFK 700 EQ-Plus, highlighting the dust extraction port and ergonomic design.
4. Танзимот
- Cutter Installation:
Ensure the machine is unplugged. Use the spindle lock mechanism for quick and easy cutter changes. Insert the desired cutter (e.g., Flush cutter D 19 x 16) into the clamp (Ø 8 mm) and tighten securely with the service tools provided.
- Пайвастшавӣ барои истихроҷи чанг:
Attach a suitable dust extraction hose to the 27 mm dust suction connection port on the machine. This helps maintain a clean working environment and improves visibility.
- Milling Table Adjustment:
The insertable milling table provides excellent support. Adjust the table to the desired position for your application. The table is designed with a 1.5° incline for optimal milling results.
- Milling Depth Adjustment:
Adjust the milling depth with precision, up to 1/10 mm accuracy. Use the adjustment mechanism to set the vertical and horizontal milling depths as required for your task.

Расми 3: Муфассал view of the milling depth adjustment and the spring feeler, crucial for precise operations.
5. Дастурҳои истифодабарӣ
The Festool OFK 700 EQ-Plus is designed for precise edge milling applications. Follow these steps for operation:
- Фаъол:
Connect the machine to a suitable power outlet (230V AC). Turn on the machine using the power switch. The empty speed can be adjusted between 10,000 and 26,000 min⁻¹.
- Ҷойгиркунӣ:
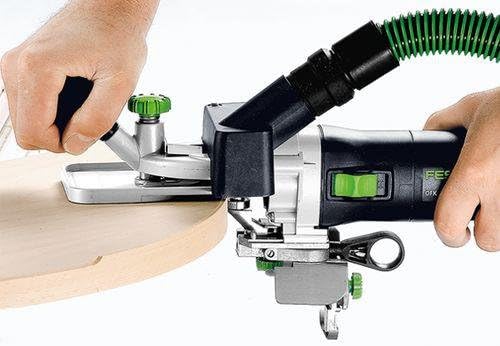
Position the milling machine on the edge of the workpiece. The spring feeler ensures a perfect milling surface by maintaining consistent contact.

Figure 4: Demonstrating the machine in use for edge milling on a curved wooden piece, showing precise control.
- Milling Process:
Guide the machine smoothly along the edge of the workpiece. The OFK 700 EQ-Plus is suitable for various tasks:
- Creating protrusions on surfaces and edges made of plastic or wood.
- Rounding and beveling of edges.
- Milling front grooves for housing edges with PVC core.
- Flushing of laminate plates.
- Milling gluing profiles in concave and convex pieces, such as round tables or desk plates.
Расми 5: Муфассал view of the milling operation, illustrating the clean and precise cut achieved on a wooden edge.
- Хомӯш:
Once milling is complete, turn off the machine and disconnect it from the power supply.
6. Нигоҳдорӣ
Regular maintenance ensures the longevity and optimal performance of your Festool OFK 700 EQ-Plus.
- Тозакунӣ: After each use, clean the machine, especially the milling table and cutter area, to remove dust and debris. Use a brush or compressed air.
- Cutter Inspection: Regularly inspect the milling cutter for wear or damage. Replace dull or damaged cutters immediately to ensure precise results and prevent strain on the machine.
- Молидани: Refer to the detailed service manual for specific lubrication points and schedules, if applicable.
- Нигоҳдорӣ: Store the machine and its accessories in the SYSTAINER SYS 2 T-LOC case in a dry, secure location, away from direct sunlight and extreme temperatures.
7. Баррасии мушкилот
| Мушкилот | Сабаби эҳтимолӣ | Ҳалли |
|---|---|---|
| Мошин ба кор намеояд | Не таъминоти барқ; ноқис сими барқ; хомӯш кардани барқ. | Check power connection; inspect power cord for damage; ensure power switch is in 'ON' position. |
| Poor milling quality | Dull or incorrect cutter; incorrect milling depth; unstable workpiece. | Replace cutter; adjust milling depth; secure workpiece firmly. |
| Вибрацияи аз ҳад зиёд | Loose cutter; damaged cutter; internal mechanical issue. | Tighten cutter securely; replace damaged cutter; contact Festool service if problem persists. |
For issues not listed here, please contact Festool customer support.
8. Мушаххасоти техникӣ
| Хусусият | Мушаххасоти |
|---|---|
| Истеъмоли қувваи барқ | 720 В |
| Empty Speed | 10,000 - 26,000 дақ⁻¹ |
| Max. Cutter Diameter | 26 мм |
| Clamp Диаметр | 6-8 мм |
| Max. Vertical Milling Depth | 9 мм |
| Max. Horizontal Milling Depth | 5 мм |
| Max. Milling Width | 14 мм |
| Dust Suction Connection Ø | 27 мм |
| Вазн | 2 кг (4.4 фунт) |
| Ҷилдиtage | 230В AC |
| Материал | Пластмасса |
| Андозаҳои маҳсулот (L x W x H) | 6.34 x 15.51 x 3.94 инч |
9. Кафолат ва дастгирӣ
For detailed warranty information, please refer to the warranty card included with your product or visit the official Festool website. For technical support, spare parts, or service inquiries, please contact Festool customer service or visit the Festool Store on Amazon.


