1. Муқаддима
This manual provides essential instructions for the safe and effective operation, setup, and maintenance of your Genesis GMS1015LC 15-Amp 10-Inch Compound Miter Saw. This powerful tool is designed for precise wood-cutting tasks, including straight crosscuts, miter cuts, bevel cuts, and compound cuts. Please read this manual thoroughly before initial use to ensure proper handling and to prevent injury or damage.
The GMS1015LC features a 15-amp motor, a 10-inch blade, a laser light cutting guide for enhanced accuracy, and 9 positive miter stops for quick angle adjustments. It is suitable for various woodworking projects, from cutting flooring and molding to dimensional lumber.
2. Дастурҳои муҳим оид ба бехатарӣ
Ҳангоми истифодабарии асбобҳои барқӣ ҳамеша ба бехатарӣ афзалият диҳед. Риоя накардани ин дастурҳо метавонад боиси осеби ҷиддӣ ё хисороти молӣ гардад.
- Муҳофизати чашм: Always wear appropriate eye protection, such as safety glasses or goggles, when operating the miter saw.
- Муҳофизати шунавоӣ: The saw generates significant noise during operation. Use hearing protection to prevent hearing damage.
- Минтақаи корӣ: Ensure your work area is clean, well-lit, and free from obstructions. Keep children and bystanders away from the operating area.
- Мутобиқати моддӣ: This miter saw is designed exclusively for cutting wood and wood-based materials. DO NOT use this saw to cut metal. Cutting metal can cause damage to the saw's components and pose a safety hazard.
- Корти бехатар: Always secure the workpiece firmly with the hold-down clamp or other appropriate methods before cutting to prevent movement and kickback.
- Санҷиши пиёз: Before each use, inspect the blade for damage, dullness, or cracks. Replace damaged blades immediately.
- Қатъи барқ: Пеш аз танзим, иваз кардани теғҳо ё анҷом додани таъмир, арраро аз манбаи барқ ҷудо кунед.
- Пешниҳоди 65 Огоҳӣ: Ин маҳсулот метавонад шуморо ба моддаҳои кимиёвӣ, ки ба иёлати Калифорния маълуманд ва боиси саратон ва нуқсонҳои модарзодӣ ё дигар зарарҳои репродуктивӣ мешаванд, дучор кунад. Пас аз кор дастҳоятонро бишӯед.
3. Қисмҳо ва мундариҷаи бастаҳо
Your Genesis GMS1015LC Miter Saw package includes the following items:
- Genesis GMS1015LC 10-Inch Compound Miter Saw
- 60T Carbide Tipped Blade (installed)
- Нигоҳ доред Clamp
- Халтаи ғуборолуд
- (2) Extension Wings
- (2) AAA Batteries for Laser
- Калиди корд
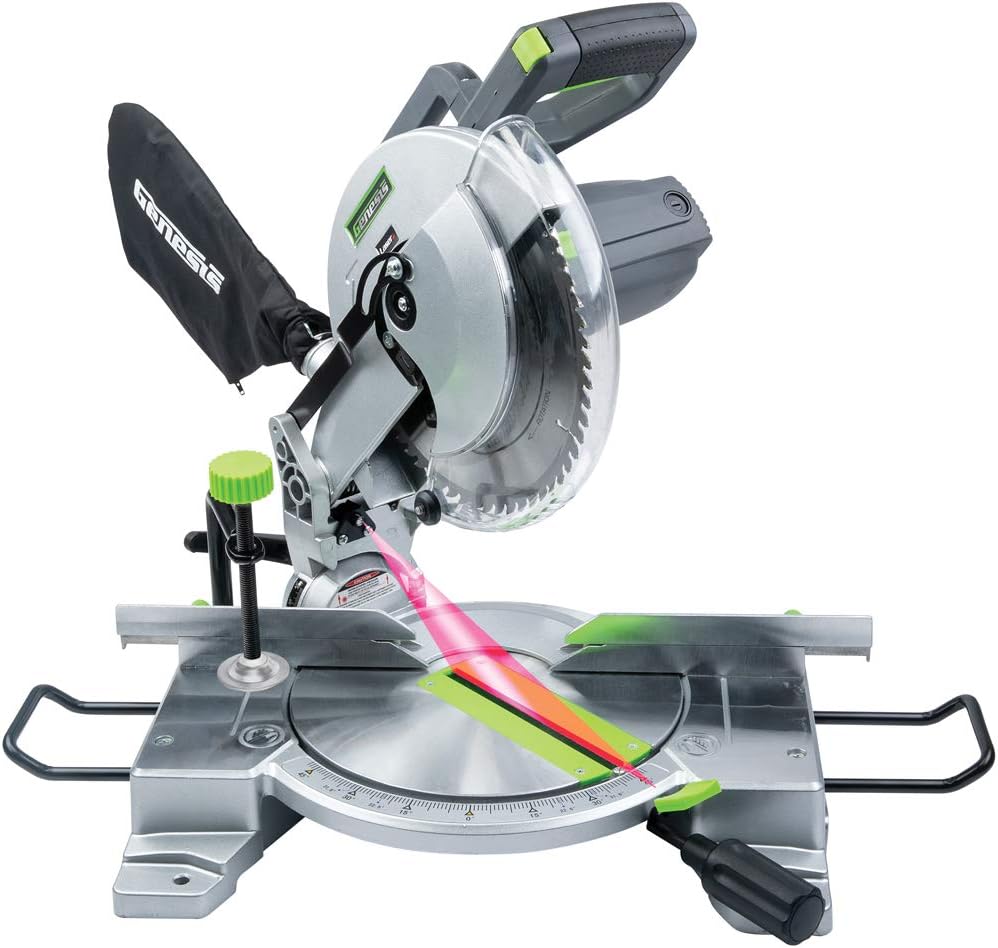
Расми 3.1: Зиёдview of the Genesis GMS1015LC Miter Saw, showing the blade, laser guide, dust bag, and base.
4. Танзимот
4.1 Blade Installation/Replacement
The 60T carbide-tipped blade is typically pre-installed. If replacement is necessary:
- Арраро аз манбаи барқ ҷудо кунед.
- Press and hold the arbor lock button to prevent the blade from rotating.
- Use the provided blade wrench to loosen the arbor nut.
- Carefully remove the old blade and install the new blade, ensuring the teeth are oriented correctly for cutting.
- Tighten the arbor nut securely while holding the arbor lock.
4.2 Attaching Extension Wings
The two extension wings provide additional support for longer workpieces. Slide them into the designated slots on either side of the saw base and secure them with the provided fasteners.
4.3 Насб кардани халтаи чанг
Attach the dust bag to the exhaust port at the rear of the blade guard. Ensure it is securely fastened to collect sawdust during operation. For improved dust collection, consider connecting a shop vacuum to the exhaust port.
4.4 Laser Guide Battery Installation
The laser guide requires two AAA batteries (included). Locate the battery compartment, typically on the laser module, and insert the batteries according to the polarity markings.
5. Дастурҳои истифодабарӣ
5.1 Амалиёти асосӣ
To start the saw, depress the trigger switch on the handle. Release the switch to stop the saw. The electric brake will stop the blade rotation within seconds after releasing триггер.
5.2 Making Straight Crosscuts
- Place the workpiece firmly against the fence and the saw base.
- Қисми кориро бо cl нигоҳ доштан мустаҳкам кунедamp.
- Align the blade with your cut line, using the laser guide for precision.
- Start the saw, allow the blade to reach full speed, then slowly lower the blade through the workpiece.
- Once the cut is complete, release the trigger and allow the blade to stop before raising it.
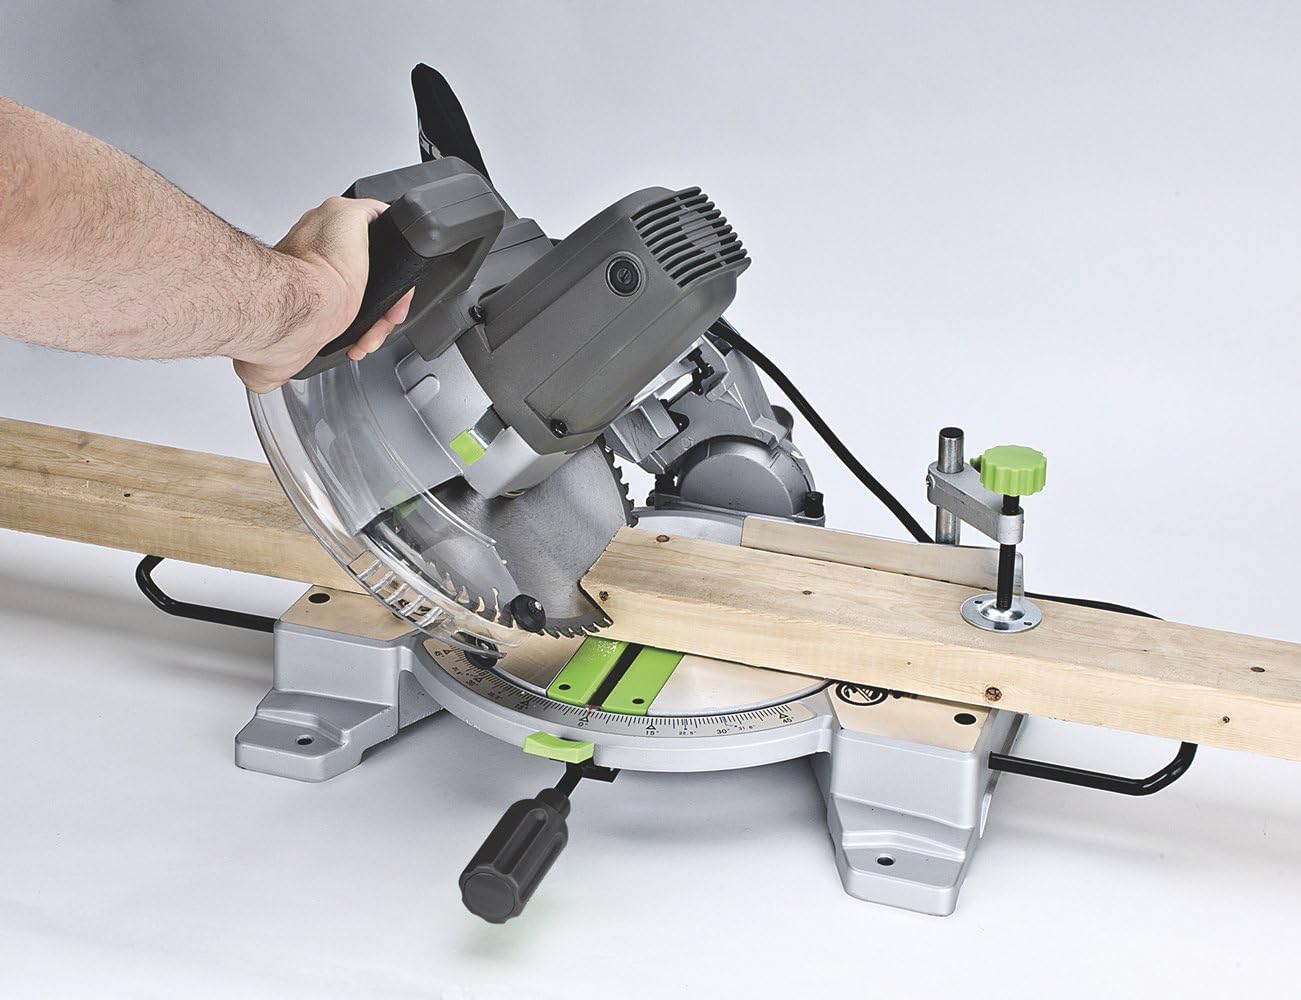
Figure 5.1: Demonstrating a straight crosscut on a wooden board.
5.3 Making Miter Cuts
The saw allows for miter cuts up to 45 degrees left and right. It features 9 positive detent stops at common angles for quick and accurate adjustments.
- Тугмаи қулфи мушро кушоед.
- Rotate the turntable to the desired miter angle. The detent stops will help you locate common angles.
- Tighten the miter lock knob firmly.
- Proceed with the cut as described in Section 5.2.
5.4 Making Bevel Cuts
The saw can make bevel cuts up to 45 degrees to the left.
- Loosen the bevel lock knob (usually located at the rear of the saw).
- Tilt the saw head to the desired bevel angle (up to 45 degrees left).
- Тугмаи қулфи кунҷро боэҳтиёт пурзӯр кунед.
- Proceed with the cut as described in Section 5.2.
5.5 Making Compound Cuts
Compound cuts involve simultaneously setting both a miter angle and a bevel angle. This is useful for crown molding, picture frames, and other intricate woodworking.
- Set the desired miter angle (Section 5.3).
- Set the desired bevel angle (Section 5.4).
- Ensure both angles are locked firmly in place.
- Proceed with the cut as described in Section 5.2.

Figure 5.2: Performing a precise cut on molding, demonstrating the saw's versatility.

Figure 5.3: The miter saw in action, cutting a wider piece of lumber.
5.6 Using the Laser Guide
The integrated laser guide projects a red line onto the workpiece, indicating the exact path of the blade. This feature aids in quicker alignment and improved cutting accuracy. Ensure the laser batteries are installed and functional.

Figure 5.4: The laser guide clearly indicating the cut line on a wooden board.
6. Нигоҳдорӣ
6.1 Тозакунӣ
Regular cleaning extends the life of your saw. After each use, disconnect the power and use a brush or compressed air to remove sawdust and debris from the motor vents, blade guard, and base. Empty the dust bag frequently.
6.2 Blade Changes
Refer to Section 4.1 for detailed instructions on changing the blade. Always use sharp, appropriate blades for the material being cut.
6.3 Санҷиши умумӣ
Periodically check all fasteners for tightness. Inspect the power cord for damage. Ensure all moving parts operate smoothly. Lubricate pivot points as recommended by the manufacturer (refer to the full product manual for specific lubrication points).
7. Баррасии мушкилот
- Арра оғоз намекунад: Check power connection, ensure the trigger is fully depressed.
- Laser guide not working: Check if AAA batteries are correctly installed and charged. Replace if necessary.
- Буришҳои нодуруст: Verify that the miter and bevel angles are correctly set and locked. Ensure the workpiece is securely clamped. Check the blade for damage or dullness.
- Excessive dust: Ensure the dust bag is properly attached and not full. Consider connecting a shop vacuum for more efficient dust extraction.
- Blade getting caught/crooked: Ensure the blade guard operates freely and is not obstructed. Check for any misalignment of components.
For issues not covered here, please consult the full product manual or contact customer support.
8. Мушаххасоти
| Хусусият | Мушаххасоти |
|---|---|
| Рақами модел | GMS1015LC |
| Манбаи нерӯ | Қувваи AC |
| Ҷилдиtage | 120 вольт |
| AmpИқтидори эҳё | 15 Amps |
| Ватtage | 1800 ватт |
| Суръат | 4600 чархзании |
| Дарозии тир | 10 инч |
| Маводҳои пиёз | Карбид |
| Cutting Angle (Miter) | Up to 45 Degrees Left/Right |
| Cutting Angle (Bevel) | Up to 45 Degrees Left |
| Ранги нури лазерӣ | Сурх |
| Вазни ашё | 16 унсия (1 фунт) |
| Андозаҳои маҳсулот | 19.5"L x 16.25"W x 15"H |
9. Маълумот дар бораи кафолат
The Genesis GMS1015LC Miter Saw comes with a Кафолати 2 сол. This warranty covers defects in materials and workmanship under normal use. Please retain your proof of purchase for warranty claims. For full details regarding warranty terms and conditions, refer to the official warranty documentation included with your product or contact Genesis customer support.

Figure 9.1: Genesis 2-Year Warranty Badge.
10. Дастгирии муштариён
Should you require assistance with your Genesis GMS1015LC Miter Saw, including technical support, parts, or warranty service, please refer to the contact information provided in your product packaging or visit the official Genesis website. Always provide your model number (GMS1015LC) when contacting support to ensure efficient service.


