1. Маҳсулот ба охир расидview
The EPEVER TRIRON 4210N is a 40A Maximum Power Point Tracking (MPPT) solar charge controller designed for 12V/24V DC systems. It efficiently manages power from solar panels to charge various battery types, including lead-acid (Sealed, Gel, Flooded, User) and lithium (LiFePO4, Li-NiCoMn, Lithium User). This set includes the TRIRON 4210N controller and the MT50 Remote Meter for enhanced monitoring and control.
Хусусиятҳои асосӣ:
- Advanced MPPT technology for high tracking efficiency.
- Modular design for flexible configuration with different display and interface modules.
- Supports multiple battery types: Sealed (AGM), Gel, Flooded, Lead-acid User, LiFePO4 Lithium, Li(NiCoMn)O2 Lithium, Lithium User (9~34V).
- Negative ground design for broad application compatibility.
- Dual 5V DC USB output interface (Max 2.2A) for charging electronic devices.
- Чор-сtage charging (bulk, absorption, float, equalization) to prolong battery life.
- Comprehensive electronic protection features.
- Функсияи омори энергия дар вақти воқеӣ.
Мундариҷаи баста:
Маҷмӯа одатан дар бар мегирад:
- EPEVER TRIRON 4210N MPPT Solar Charge Controller
- Ҳисобкунаки дурдасти EPEVER MT50
- Remote Temperature Sensor (RT-S)
- USB to RS485 Communication Cable
- Дастури корбар

Image: Contents of the EPEVER TRIRON 4210N and MT50 Remote Meter package, including the controller, remote meter, temperature sensor, and cables.
2. Маълумот оид ба бехатарӣ
Лутфан пеш аз насб ва истифода ҳама дастурҳо ва огоҳиҳоро бодиққат хонед. Риоя накардани ин дастурҳо метавонад боиси зарбаи барқ, сӯхтор ё ҷароҳати вазнин гардад.
- Ensure all wiring is correctly polarized and securely connected. Loose connections can cause overheating and fire.
- Always connect the battery to the charge controller first, then the solar panel, and finally the load. Disconnect in the reverse order.
- Do not attempt to repair or modify the controller. Refer servicing to qualified personnel.
- Контроллерро дар ҷои хуб вентилятсияшуда, дур аз маводҳои оташгиранда ва газҳои зангзананда насб кунед.
- Wear appropriate personal protective equipment (PPE), including eye protection and insulated gloves, when working with batteries and solar panels.
- Боварӣ ҳосил кунед, ки система voltage is compatible with the controller's specifications (12V/24V auto work).
- Use appropriate circuit breakers or fuses for all connections to prevent overcurrent.
3. Насбкунӣ
3.1 Ҷойгиркунии контроллер
Mount the controller vertically on a flat, non-flammable surface in a dry, well-ventilated indoor area. Ensure there is sufficient clearance around the controller for heat dissipation. The recommended clearances are 150mm (5.9 inches) above and below the unit.

Image: Controller dimensions and recommended mounting clearances for proper ventilation.
3.2 Пайвастҳои ноқилӣ
Follow the wiring sequence carefully to prevent damage to the controller or other components. Always ensure all power sources are disconnected before making or breaking connections.
- Батареяро пайваст кунед: Connect the battery cables to the controller's battery terminals (marked with '+' and '-'). Ensure correct polarity. Always connect the battery first.
- Панели офтобиро пайваст кунед: Connect the solar panel cables to the controller's PV terminals (marked with solar panel icon and '+' and '-'). Ensure correct polarity.
- Пайваст кардани гардиши DC: Connect the DC load cables to the controller's load terminals (marked with light bulb icon and '+' and '-'). Ensure correct polarity.
- Пайваст кардани сенсори ҳарорати дурдаст: Plug the remote temperature sensor into the designated port on the controller. Secure the sensor to the battery case for accurate temperature compensation.
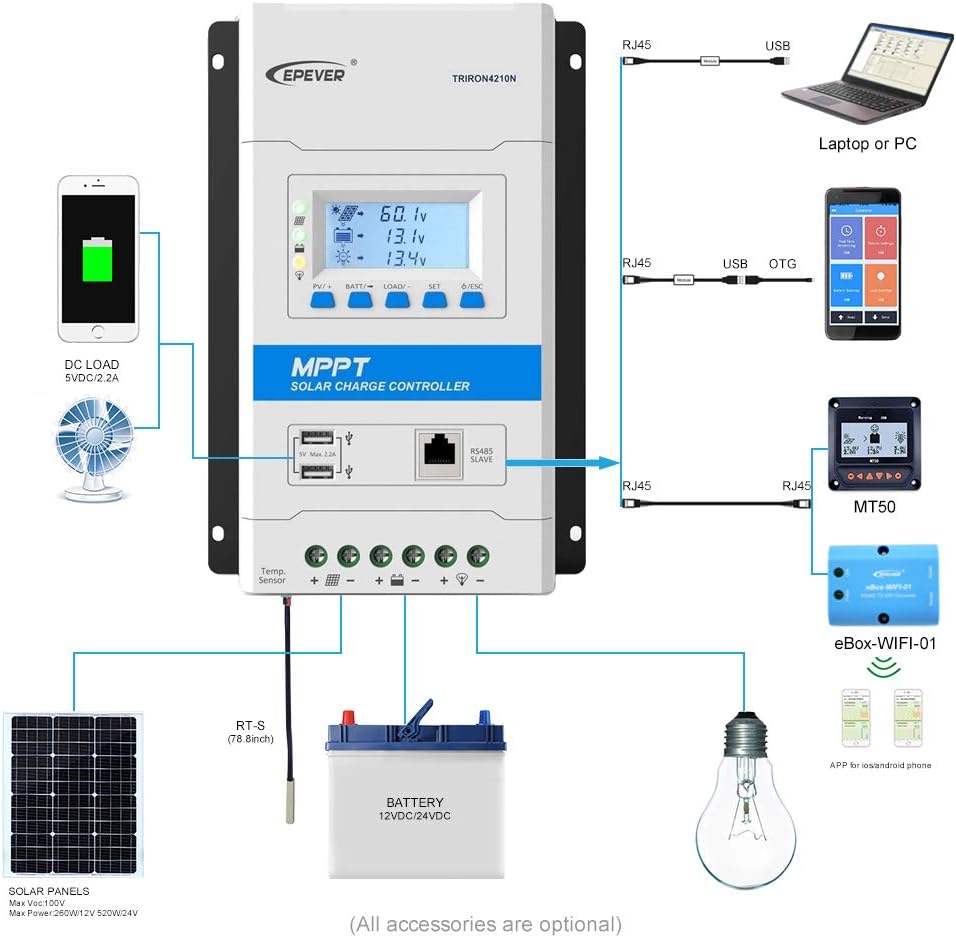
Image: Detailed wiring diagram showing connections for solar panels, battery, and DC load to the TRIRON 4210N controller.
Video: This video demonstrates the unboxing, component identification, and step-by-step installation process for the EPEVER TRIRON 4210N solar charge controller, including wiring the battery, solar panel, and remote temperature sensor.
3.3 Connecting the MT50 Remote Meter
The MT50 Remote Meter connects to the controller via an RJ45 communication cable. This allows for remote monitoring of system status and parameter settings.
- Connect one end of the RJ45 cable to the RS485 port on the TRIRON 4210N controller.
- Connect the other end of the RJ45 cable to the corresponding port on the MT50 Remote Meter.
3.4 Интерфейсҳои коммуникатсионӣ
The TRIRON 4210N features an RS485 communication port, allowing connection to various accessories for extended functionality:
- Нармафзори компютерӣ: Connect via an RS485 to USB adapter cable for monitoring and parameter configuration using PC software.
- Барномаи мобилӣ: Connect via an eBox-WIFI-01 or eBox-BLE-01 module for wireless monitoring and control through a mobile application.
4. Амалиёт
4.1 Дисплей ва тугмаҳои LCD
The controller features an LCD display and five buttons for viewing system parameters and making adjustments.

Image: Various screens displayed on the TRIRON 4210N LCD, showing PV voltage, current, battery status, and load information.
- Тугмаи PV/+: Used to navigate forward through display screens or increase parameter values.
- BATT/→ Button: Used to navigate right through display screens or move cursor during parameter setting.
- LOAD/- Тугма: Used to navigate backward through display screens or decrease parameter values.
- Тугмаи SET: Used to enter parameter setting mode or confirm a setting.
- Тугмаи ESC: Used to exit parameter setting mode or return to the previous screen.
4.2 Танзимоти параметрҳо
To adjust parameters such as battery type, capacity, and temperature unit, use the navigation buttons to access the setting menus. Press the SET button to enter edit mode, use PV/+ and LOAD/- to change values, and SET again to confirm. Refer to the detailed instructions in the included user manual for specific parameter adjustments.
4.3 баромади USB
The controller is equipped with dual 5V DC USB ports (Max 2.2A) for charging compatible electronic devices. These ports are active when the controller is powered by the battery.
5. Нигоҳдорӣ
Нигоҳдории мунтазам кори беҳтарин ва дарозумрии контроллери барқи офтобии шуморо таъмин мекунад.
- Пайвастҳоро тафтиш кунед: Periodically inspect all wiring connections for tightness and corrosion. Tighten any loose connections.
- Контроллерро тоза кунед: Keep the controller clean and free from dust and debris. Ensure the heat sink fins are not obstructed to allow for proper cooling.
- Кабелҳоро тафтиш кунед: Check all cables for signs of wear, damage, or insulation degradation. Replace damaged cables immediately.
- Санҷиши батарея: For lead-acid batteries, check electrolyte levels and terminal condition as per battery manufacturer guidelines.
- Навсозии нармафзор: Истеҳсолкунандаро санҷед website for any available firmware updates for your controller.
6. Баррасии мушкилот
This section provides basic troubleshooting steps for common issues. For more complex problems, consult the full user manual or contact EPEVER technical support.
Мушкилот ва роҳҳои ҳалли умумӣ:
- Намоиш / Не қудрат:
- Check battery connections and ensure they are secure and correctly polarized.
- Ҳаҷми батареяро тасдиқ кунедtage дар доираи амалиёти контроллер аст.
- Аз панели офтобӣ пур кардани барқ нест:
- Пайвастшавӣ ва қутбияти панелҳои офтобиро тафтиш кунед.
- Ensure sufficient sunlight is reaching the solar panels.
- Verify solar panel open circuit voltage (Voc) is within the controller's input range.
- Боркунӣ кор намекунад:
- Пайвастҳои бор ва поляризатсияро санҷед.
- Ensure the load is not exceeding the controller's rated load current.
- Ҳаҷми батареяро тафтиш кунедtage; the load may be disconnected if the battery voltage хеле паст аст.
- Incorrect Battery Readings:
- Verify the remote temperature sensor is correctly connected and placed near the battery.
- Ensure the correct battery type and capacity are set in the controller's parameters.
7. Мушаххасоти
| Параметр | Арзиш |
|---|---|
| Модели | TRIRON4210N-mppt |
| Системаи ҷилдиtage | 12/24VDC Auto Work |
| Ҷараёни номиналӣ | 40А |
| Ҳаҷми вуруди батареяtage Диапазон | 8-32В |
| Макс. PV Open Circuit Voltage | 100V (Min operating environment temp); 92V (25℃ environment temp) |
| Ҷилди MPPtage Диапазон | (Vbat+2V) ~ 72V |
| Max. PV Array Power Support | 520W (12V battery); 1040W (24V battery) |
| Ҳарорати муҳити корӣ | -25℃ ~ +55℃ (with LCD) / -30℃ ~ +55℃ (without LCD) |
| Lithium Battery Types Supported | LiFePO4 (4 series; 8 series) / Li-NiCoMn (3 series; 6 series) / User (Lithium battery setting requires RS485 or WIFI BOX) |
| Lead-acid Battery Types Supported | Sealed (AGM), Gel, Flooded, Lead-acid User |
| Истеъмоли худ | ≤14mA (12V); ≤15mA (24V) |
| Ҷуброни ҳарорат | -3mV / ℃ / 2V |
| Ба заминканӣ | Манфии умумӣ |
| Terminals/Wire Size | 6AWG (16мм²) |
| Баромади USB | Dual 5V DC, Max 2.2A |
| Вазни ашё | 6.69 фунт |
| Андозаҳои бастаҳо | 17.56 x 8.43 x 4.88 инч |
| UPC | 655160074776 |
8. Кафолат ва дастгирӣ
For warranty information and technical support, please refer to the documentation included with your product or visit the official EPEVER webсайт. Квитансияи хариди худро ҳамчун далели харид барои даъвоҳои кафолат нигоҳ доред.


