1. Муқаддима
This manual provides detailed instructions for the assembly, installation, operation, and maintenance of your AMANSON H07 ATX Mid Tower PC Case. Please read this manual thoroughly before beginning installation to ensure proper setup and safe operation. Keep this manual for future reference.

Figure 1.1: AMANSON H07 ATX Mid Tower PC Case with illuminated internal components.
2. Маълумот оид ба бехатарӣ
- Always disconnect the power supply from the wall outlet before performing any installation or maintenance inside the PC case.
- Барои пешгирӣ аз зарар, ҳамаи қисмҳоро бодиққат коркард кунед.
- Барои пешгирии зарари разряди электростатикӣ (ESD) ба ҷузъҳои ҳассоси электронӣ тасмаи дастони антистатикӣ пӯшед.
- Қисмҳои хурд ва маводи бастабандиро аз кӯдакон дур нигоҳ доред.
- Барои пешгирӣ аз гармшавии аз ҳад зиёд, вентилятсияи дурусти атрофи корпуси компютерро таъмин кунед.
3. Мундариҷаи баста
Боварӣ ҳосил кунед, ки ҳама ашё дар баста мавҷуд аст:
- AMANSON H07 ATX Mid Tower PC Case
- Accessory Box (screws, standoffs, cable ties, etc.)
- Дастури корбар (ин ҳуҷҷат)
4. Компонент барview
The AMANSON H07 PC case features a panoramic design with tempered glass panels for full visibility of your internal components. It supports various motherboard sizes and extensive cooling configurations.

Figure 4.1: Top I/O Panel with power button, USB 3.0, USB 2.0, and audio ports.
The top I/O panel includes:
- Тугмаи барқ
- Тугмаи Reset
- 2x портҳои USB 2.0
- 1x порти USB 3.0
- Audio In/Out Jacks
5. Насб ва насб
5.1. Омодасозии парванда
The AMANSON H07 features tool-less hinged tempered glass side panels for easy access. Gently open the side panel by pulling it from the rear edge. The panels can also be removed by lifting them off their hinges for full access during installation.

Figure 5.1: Hinged tempered glass side panel for easy access.
5.2. Насб кардани плата
The H07 supports E-ATX, ATX, Micro-ATX, and ITX motherboards. Install the necessary standoffs for your motherboard form factor. Carefully align your motherboard with the standoffs and I/O shield, then secure it with screws.
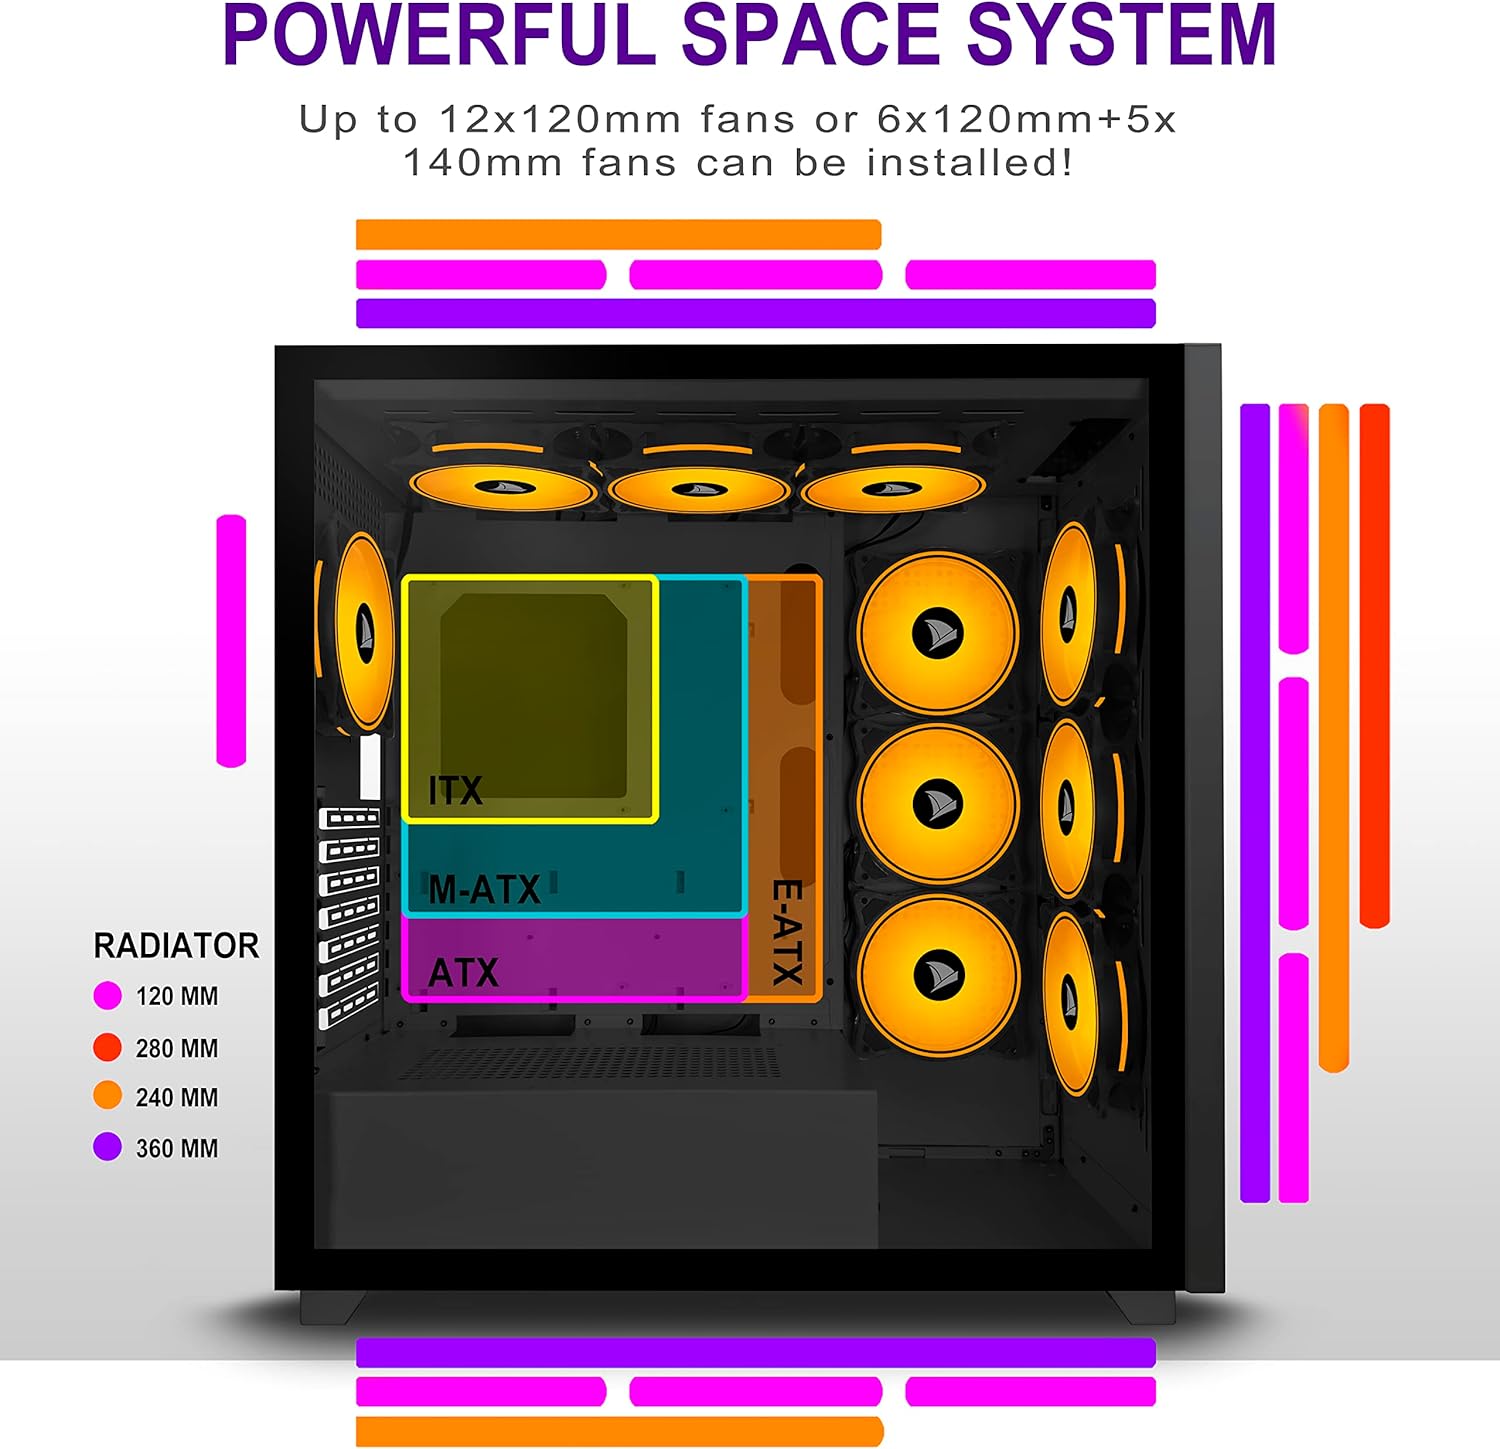
Figure 5.2: Motherboard and cooling component placement options.
5.3. Насби таъминоти барқ
Install your power supply unit (PSU) into the dedicated compartment at the bottom rear of the case. Secure it with screws from the rear of the case.
5.4. Насби дастгоҳи нигаҳдорӣ
The case provides multiple mounting points for storage devices. Install your 3.5" HDDs and 2.5" SSDs into the designated trays and mounting locations. Refer to the case diagram for specific locations.

Figure 5.3: Storage drive mounting options for HDDs and SSDs.
5.5. Expansion Card (GPU) Installation
Remove the necessary PCI-E slot covers from the rear of the case. Insert your graphics card or other expansion cards into the motherboard's PCI-E slots and secure them with screws.
5.6. Идоракунии кабел
Utilize the cable routing cutouts and tie-down points behind the motherboard tray to manage cables. This improves airflow and maintains a clean aesthetic.
6. Дастурҳои истифодабарӣ
6.1. Фурӯзон/хомӯшкунӣ
Press the power button located on the top I/O panel to turn on your PC. To shut down, use the operating system's shutdown function or press and hold the power button for several seconds.
6.2. Using Front I/O Ports
Connect USB devices to the USB 2.0 or USB 3.0 ports. Use the audio jacks for headphones, microphones, or speakers.
7. Нигоҳдорӣ
7.1. Тозакунӣ
Мунтазам тоза кардани беруни корпусро бо нарм, гamp cloth. For internal cleaning, use compressed air to remove dust from fans and components. Ensure the PC is powered off and unplugged before cleaning.
7.2. Филтрҳои чанг
The AMANSON H07 may include removable dust filters. Clean these filters periodically to maintain optimal airflow and cooling performance.
8. Баррасии мушкилот
- PC does not power on: Check all power connections, including the PSU to the wall, the PSU to the motherboard, and the front panel power switch cable to the motherboard.
- Мушкилоти аз ҳад зиёд гармшавӣ: Ensure all fans are properly installed and functioning. Verify that dust filters are clean and not obstructing airflow. Check thermal paste application on CPU cooler.
- Портҳои USB кор намекунанд: Confirm that the front panel USB cables are correctly connected to the motherboard headers.
- Audio jacks not working: Verify that the front panel audio cable is correctly connected to the motherboard's audio header.
9. Мушаххасоти
Below are the technical specifications for the AMANSON H07 PC Case:
| Хусусият | Тафсилот |
|---|---|
| Модели | H07 |
| Навъи парванда | Мандарин |
| Мутобиқати motherboard | E-ATX, ATX, Micro ATX, ITX |
| Материал | Шишаи ҳамвор |
| Андозаҳои маҳсулот (LxWxH) | 19.69 x 13.78 x 19.69 инч (500 x 350 x 500 мм) |
| Вазни ашё | 24.2 фунт |
| Шумораи портҳои USB 2.0 | 2 |
| Шумораи портҳои USB 3.0 | 1 |
| Шумораи ҷойҳои васеъкунӣ | 8 |
| Усули хунуккунӣ | Ҳаво |
| Навъи васлкунии таъминоти барқ | Кӯҳи поён |

Figure 9.1: AMANSON H07 PC Case dimensions (520mm height, 510mm length, 250mm width).
10. Маълумот дар бораи кафолат
Please refer to the product packaging or the official AMANSON webбарои шартҳо ва қоидаҳои мушаххаси кафолат ба сомона муроҷиат кунед. Барои даъвоҳои кафолат далели хариди худро нигоҳ доред.
11. Дастгирӣ
For technical assistance or customer support, please visit the official AMANSON website or contact their customer service department. Contact details can typically be found on the product packaging or the brand's webсайт.


