1. Муқаддима
This manual provides detailed instructions for the installation, operation, and maintenance of your darkFlash Aquarius Mesh Computer Case. Please read this manual thoroughly before beginning installation to ensure proper setup and safe use of your new computer chassis.
2. Маълумот оид ба бехатарӣ
Ҳамеша чораҳои бехатарии зеринро риоя кунед:
- Disconnect all power sources before installing or removing any components.
- Барои пешгирии зарари разряди электростатикӣ (ESD) ба ҷузъҳо тасмаи дастони антистатикӣ пӯшед.
- Handle components carefully to avoid physical damage.
- Қисмҳо ва асбобҳои хурдро аз кӯдакон дур нигоҳ доред.
- Ensure proper ventilation around the computer case.
3. Мундариҷаи баста
Боварӣ ҳосил кунед, ки ҳама ашё дар бастаи шумо мавҷуданд:
- darkFlash Aquarius Mesh Computer Case
- Қуттии лавозимот (винтҳо, қулфҳо, ресмонҳои кабелӣ ва ғайра)
- Дастури корбар (ин ҳуҷҷат)
4. Танзим ва насб
Follow these steps for proper component installation.
4.1. Омодасозии парванда
Before installing components, remove the side panels. The Aquarius Mesh case typically features a tempered glass side panel and a solid metal panel.
- Locate the thumbscrews on the rear of the case securing the side panels.
- Unscrew the thumbscrews and carefully slide the panels backward, then lift them off.

Расми 1: Пеш ва паҳлӯ view of the darkFlash Aquarius Mesh case. Note the mesh front panel and tempered glass side panel.

Расми 2: Қафо view of the darkFlash Aquarius Mesh case, showing expansion slots and rear fan mount.
4.2. Насб кардани плата
The Aquarius Mesh supports ATX, Micro-ATX, and Mini-ITX motherboards.
- Сипари вуруд/хуруҷро ба сӯрохие, ки дар қафои корпус ҷойгир аст, насб кунед.
- Align your motherboard with the pre-installed standoffs. Ensure the I/O ports align with the I/O shield.
- Secure the motherboard with the appropriate screws from the accessory box.
Расми 3: Интерьер view of the darkFlash Aquarius Mesh case, highlighting the motherboard tray and cable routing options.
4.3. Насби воҳиди таъминоти барқ (PSU).
The PSU mounts at the bottom rear of the case.
- Slide the PSU into its designated compartment from the rear of the case.
- Align the screw holes and secure the PSU with screws.
4.4. Насби диски нигаҳдорӣ
The case provides mounting options for 3.5-inch HDDs and 2.5-inch SSDs.
- Дискҳои сахти 3.5 дюймӣ: Locate the drive cage usually beneath the PSU shroud or behind the motherboard tray. Slide the HDD into the bay and secure it with screws.
- SSD-ҳои 2.5 дюймӣ: Mount SSDs to dedicated brackets behind the motherboard tray or on the PSU shroud. Secure with screws.

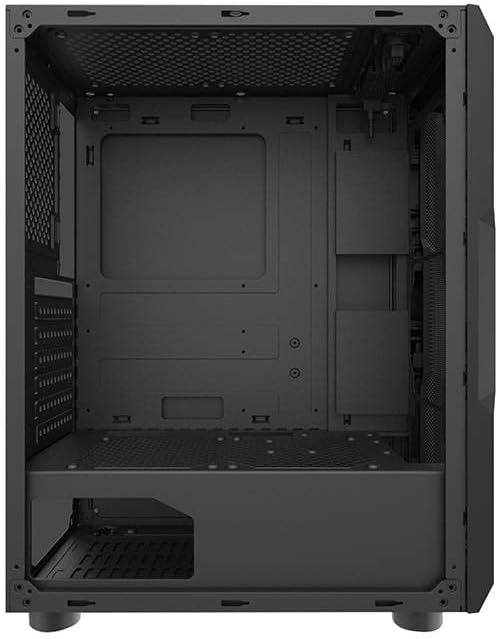
Расми 4: Дохили қафо view of the darkFlash Aquarius Mesh case, showing the motherboard cutout and potential SSD mounting points.
4.5. Expansion Card Installation (e.g., GPU)
- Сарпӯшҳои зарурии сӯрохи васеъкуниро аз қафои корпус хориҷ кунед.
- Insert the expansion card into the appropriate PCIe slot on the motherboard.
- Secure the card with the provided screws or retention clips.
4.6. Идоракунии кабел
Барои ташкили кабелҳо, буришҳои масири кабелҳо ва нуқтаҳои пайвасткунии онҳо дар паси табақи модарӣ истифода баред. Ин ҷараёни ҳаво ва зебоиро беҳтар мекунад.
4.7. Reassembling the Case
Once all components are installed and cables are managed:
- Carefully reattach the side panels, ensuring they slide into place correctly.
- Secure the side panels with the thumbscrews.
5. Дастурҳои истифодабарӣ
After assembly, connect your peripherals and power cable.
- Connect your monitor, keyboard, mouse, and other peripherals to the motherboard's I/O ports.
- Сими барқро ба PSU ва васлаки деворӣ пайваст кунед.
- Press the power button located on the top panel of the case to start your computer.

Расми 5: боло view of the darkFlash Aquarius Mesh case, showing the front I/O panel with power button, reset button, USB ports, and audio jacks.
6. Нигоҳдорӣ
Нигоҳубини мунтазами компютери шумо барои таъмини кори беҳтарин ва дарозмуддати қисмҳои он мусоидат мекунад.
- Филтрҳои чанг: The Aquarius Mesh case features removable dust filters (e.g., on the front, top, and bottom). Regularly remove and clean these filters with water and mild soap, or by vacuuming, to maintain good airflow. Ensure they are completely dry before reinstallation.
- Тозакунии дохилӣ: Periodically open the case and use compressed air to remove dust buildup from fans, heatsinks, and other components.
- Тозакунии берунӣ: Сатҳи беруниро бо нарм пок кунед, гamp матоъ. Аз маводи кимиёвии сахт худдорӣ намоед.
7. Баррасии мушкилот
If you encounter issues, consider the following common solutions:
- Не қудрат:
- Боварӣ ҳосил кунед, ки калиди PSU дар ҳолати 'ON' аст.
- Ҳамаи пайвастҳои барқро ба motherboard ва ҷузъҳо санҷед.
- Verify the power cable is securely plugged into the wall outlet and PSU.
- Мухлисон чарх намезананд:
- Check fan connections to the motherboard or fan controller.
- Ensure fans are not obstructed by cables or dust.
- Front Panel I/O Not Working:
- Verify that the front panel connectors (USB, audio, power/reset switches) are correctly connected to the motherboard headers. Refer to your motherboard manual for header locations.
8. Мушаххасоти
| Хусусият | Тафсилот |
|---|---|
| Бренд | darkFlash |
| Рақами модел | Aquarius Mesh |
| Навъи парванда | Манораи миёна |
| Материал | Пӯлоди хӯлаи |
| Ранги | Сиёҳ |
| Усули хунуккунӣ | Ҳаво |
| Истифодаи тавсияшаванда | Компютер |
| Hard Drive Form Factor | 3.5 инч |
9. Кафолат ва дастгирӣ
For warranty information or technical support, please refer to the official darkFlash webсайт ё бо хидмати мизоҷони худ тамос гиред. Барои даъвоҳои кафолат далели хариди худро нигоҳ доред.
Барои кӯмаки иловагӣ, шумо метавонед ба сайт муроҷиат кунед darkFlash official webсайт.


