1. Муқаддима
This manual provides detailed instructions for the IINE Wireless Pro Controller, designed for use with Nintendo Switch, Switch OLED, and Switch Lite consoles. Please read this manual carefully before use to ensure proper operation and to maximize your gaming experience.

Image 1: The IINE Wireless Pro Controller, featuring a gold and green design with various buttons and joysticks.
2. Мундариҷаи баста
Лутфан ҳангоми кушодани қуттӣ мундариҷаи бастаро тафтиш кунед, то боварӣ ҳосил кунед, ки ҳама ашё мавҷуд аст:
- 1 x IINE Wireless Pro Controller
- 1 х Сими барқи USB-C
- 1 x Дастури дастурӣ (ин ҳуҷҷат)

Image 2: Visual representation of the controller and its packaging, indicating the included items.
3. Тарҳбандии контроллер
Familiarize yourself with the buttons and features of your IINE Wireless Pro Controller:
- Стики аналогии чап: Барои ҳаракат ва назорати камера.
- Stick аналогии рост: Барои назорати камера ва ҳадаф.
- Панели самтнок (D-Pad): Барои паймоиши меню ва амалҳои мушаххаси бозӣ.
- Тугмаҳои A/B/X/Y: Тугмаҳои амал.
- Тугмаҳои L/R: Тугмаҳои китф.
- Тугмаҳои ZL/ZR: Тугмаҳои триггер.
- Тугмаи минус (-): Select/Back button.
- Тугмаи Плюс (+): Тугмаи Оғоз/Таваққуф.
- Тугмаи хонагӣ: Returns to the Switch Home menu.
- Тугмаи скриншот: Скриншотҳоро мегирад.
- Тугмаи Turbo (T): Activates/deactivates Turbo function.
- Сенсори NFC: For Amiibo functionality (located near the center of the controller).
- Порти USB-C: Барои пур кардани барқ ва пайвасти симӣ.
- Чароғҳои нишондиҳанда: Display connection status and battery level.
4. Насбкунӣ ва пайвастшавӣ
4.1 Initial Pairing with Nintendo Switch
- Дар консолии Nintendo Switch ба менюи HOME гузаред.
- "Назоратчиён" > "Тағйир додани чанг/тартиб" -ро интихоб кунед.
- While on the "Change Grip/Order" screen, press and hold the Тугмаи хонагӣ on the IINE Pro Controller for 3-5 seconds until the indicator lights start flashing rapidly.
- Once the controller is successfully paired, the corresponding player indicator light(s) on the controller will remain solid.
4.2 Reconnecting to Nintendo Switch
If the controller has been previously paired, simply press the Тугмаи хонагӣ to wake it up. It will automatically attempt to reconnect to the last paired Switch console.
4.3 Пайвасти симӣ
You can connect the controller to your Nintendo Switch dock using the provided USB-C cable. Ensure "Pro Controller Wired Communication" is enabled in the Switch System Settings (System > Controllers and Sensors > Pro Controller Wired Communication).
4.4 PC Steam Connection
The controller also supports PC Steam. Connect the controller to your PC via the USB-C cable. Your PC should recognize it as a gamepad. You may need to configure controller settings within Steam's Big Picture Mode or specific game settings.

Image 3: The controller shown alongside various Nintendo Switch models and a PC monitor, illustrating its broad compatibility.
5. Дастурҳои истифодабарӣ
5.1 Wake Up Function
When the Switch console is in sleep mode, press the Тугмаи хонагӣ on the controller to wake up the console and automatically reconnect the controller.
5.2 Функсияи турбо
The Turbo function allows for rapid, automatic pressing of a button. It supports both auto-fire and manual fire dual modes.
- To set Manual Turbo: -ро пахш карда нигоҳ доред Тугмаи T, then press any of the A/B/X/Y/L/R/ZL/ZR buttons once. The button will now activate Turbo when held down.
- Барои танзим кардани турбои худкор: -ро пахш карда нигоҳ доред Тугмаи T, then press the desired A/B/X/Y/L/R/ZL/ZR button twice. The button will now continuously activate Turbo without needing to be held.
- To cancel Turbo for a specific button: -ро пахш карда нигоҳ доред Тугмаи T, then press the desired A/B/X/Y/L/R/ZL/ZR button a third time.
- To cancel all Turbo functions: -ро пахш карда нигоҳ доред Тугмаи T барои 5 сония.
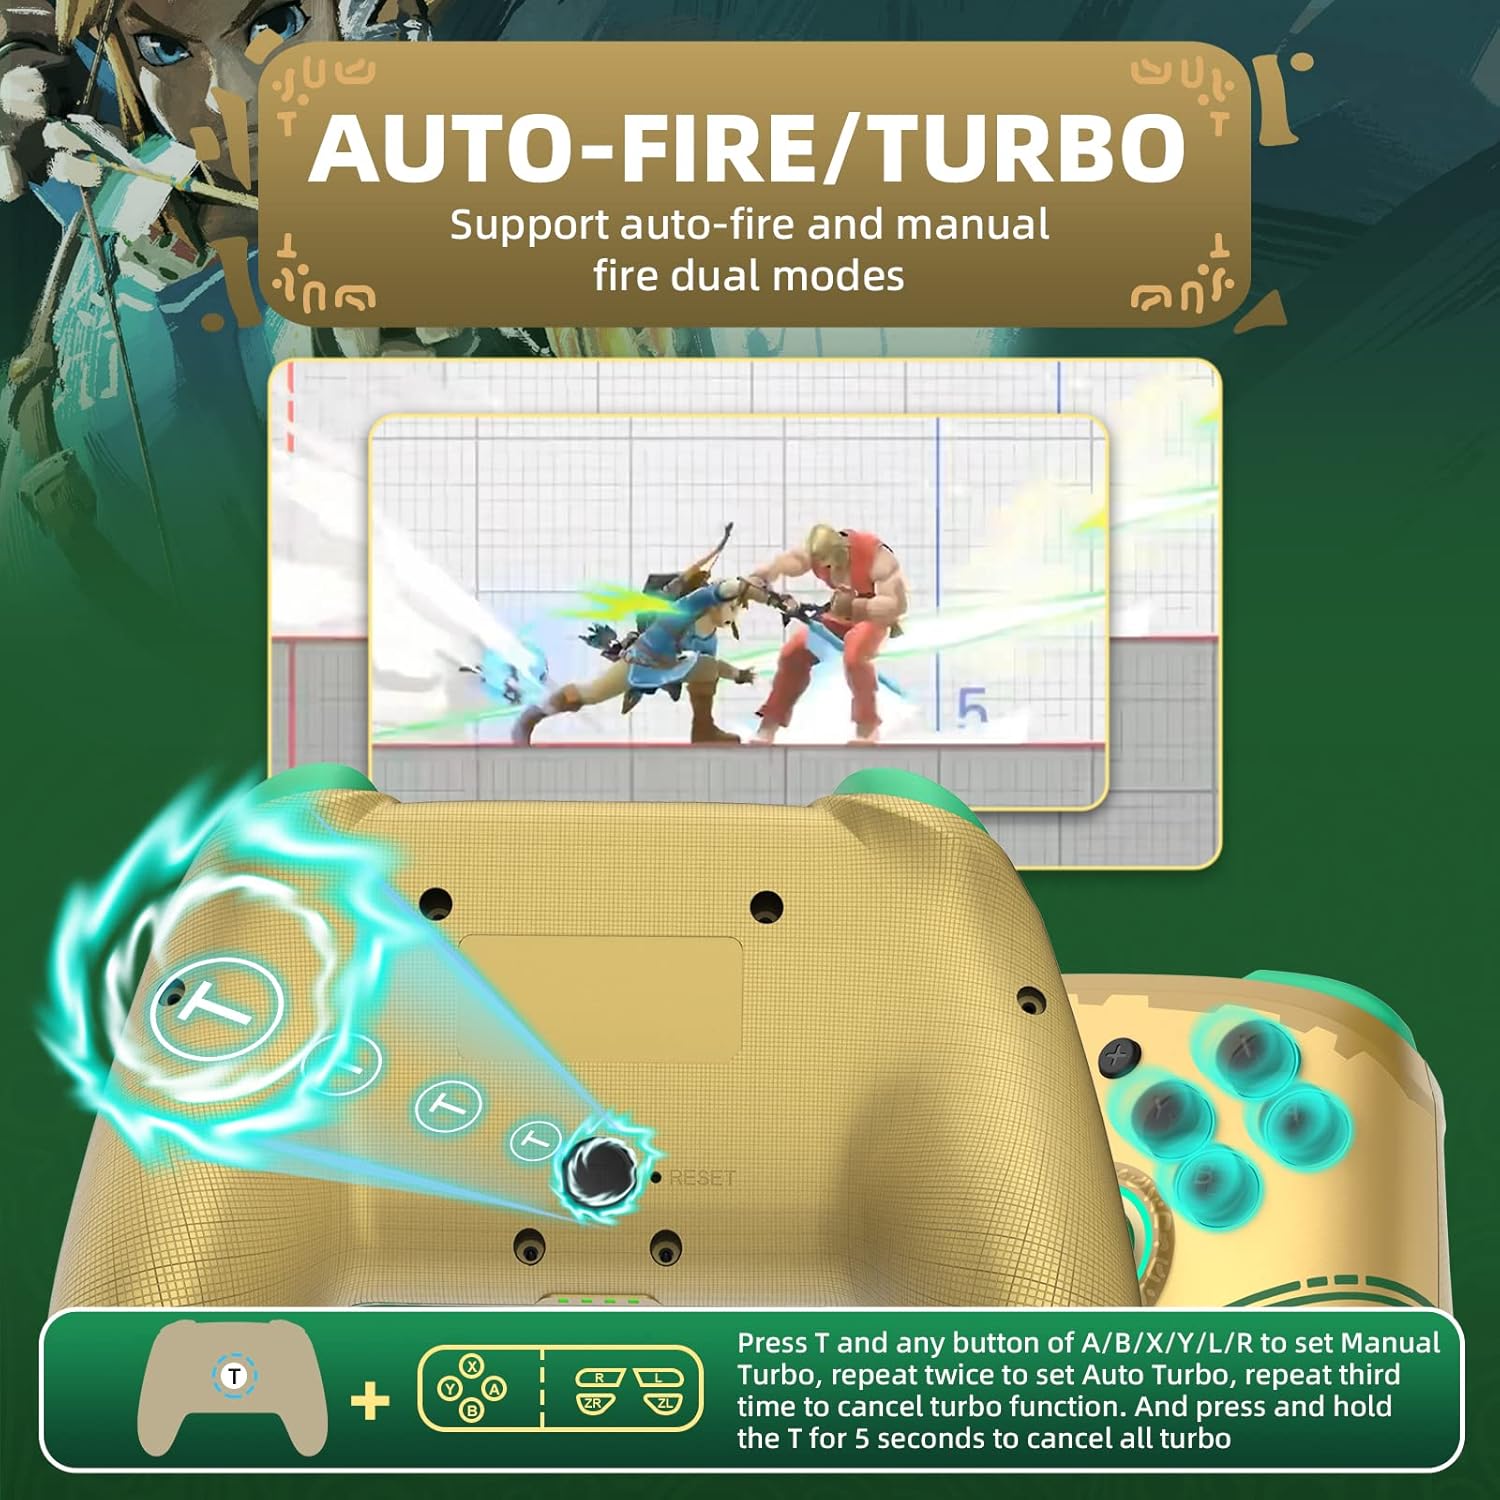
Image 4: Diagram illustrating the button combinations for setting and canceling the Turbo function on the controller.
5.3 Танзими ларзиш
The controller features dual vibration feedback with 5 adjustable levels (0%, 30%, 50%, 70%, 100%).
- To adjust vibration intensity: -ро пахш карда нигоҳ доред Тугмаи T, пас тугмаро пахш кунед Directional Button Up to increase vibration or Directional Button Down to decrease vibration.
- Сатҳи пешфарз ларзиш 50% аст.

Image 5: Graphic showing the T button and directional buttons used to adjust the vibration intensity, with a scale from 0% to 100%.
5.4 Танзими рӯшноии RGB
The controller features RGB lighting around the analog sticks, which can be customized.
- To change monochromatic light color: -ро пахш карда нигоҳ доред Тугмаи T, пас тугмаро пахш кунед Аналоги чап (L3) once. Repeat to cycle through colors.
- To activate colorful light mode: -ро пахш карда нигоҳ доред Тугмаи T, then double-press the Аналоги чап (L3).
- Барои танзими равшанӣ: -ро пахш карда нигоҳ доред Тугмаи T, пас тугмаро пахш кунед Аналоги рост (R3) барои танзими сатҳи равшанӣ.

Image 6: Instructions for changing the RGB light color and adjusting brightness using the T button and analog stick presses.
5.5 NFC/Amiibo Function
The controller supports NFC functionality for scanning Amiibo figures and cards.
- Ensure the NFC function is enabled in your game or Switch system settings.
- Place your Amiibo figure or card over the NFC sensor area, typically located near the center of the controller, between the analog sticks.
- The console will register the Amiibo data.

Image 7: Graphic highlighting the NFC area on the controller, indicating support for Amiibo scanning.
5.6 Идоракунии ҳаракат (Гироскопи 6-меҳварӣ)
The built-in 6-axis gyroscope provides precise motion control for compatible games, enhancing gameplay through features like visual angle adjustment, direction control, and aim shooting.

Image 8: Illustrations demonstrating the 6-axis gyro functionality for visual angle adjustment, direction control, and aim shooting in games.
6. Пур кардани контроллер
The controller is equipped with a 600mAh high-capacity rechargeable battery.
- Connect the provided USB-C charging cable to the USB-C port on the controller.
- Connect the other end of the cable to a USB power source (e.g., Nintendo Switch dock, USB wall adapter, computer USB port).
- The indicator lights on the controller will show charging status. They will typically blink while charging and turn solid or off when fully charged.
- Пуркунии пурра одатан тақрибан 2-3 соатро мегирад.
7. Нигоҳдорӣ
- Контроллерро хушк ва аз намӣ дур нигоҳ доред.
- Аз таъсири контроллер дар ҳарорати аз ҳад зиёд худдорӣ кунед.
- Контроллерро бо матои нарм ва хушк тоза кунед. Аз маводи кимиёвии сахт ё маводҳои абразивӣ истифода набаред.
- Барои пешгирӣ аз афтидан ё бархӯрдҳо, контроллерро дар ҷои бехатар нигоҳ доред.
8. Баррасии мушкилот
- Controller does not connect:
- Боварӣ ҳосил кунед, ки контроллер пур карда шудааст.
- Repeat the initial pairing process (Section 4.1).
- Ensure the Switch console is updated to the latest firmware.
- Try connecting the controller via USB-C cable to the Switch dock.
- Reset the controller by inserting a thin object into the small reset hole (if present, usually on the back).
- Тугмаҳо ё джойстикҳо ҷавоб намедиҳанд:
- Санҷед, ки контроллер дуруст пайваст шудааст.
- Test the controller in Switch's "Calibrate Control Sticks" or "Test Input Devices" settings.
- Боварӣ ҳосил кунед, ки ягон партов тугмаҳо ё чӯбҳоро халалдор намекунад.
- Vibration is not working:
- Check the vibration adjustment settings (Section 5.3) to ensure it's not set to 0%.
- Боварӣ ҳосил кунед, ки бозии шумо бозгашти ларзишро дастгирӣ мекунад.
- NFC/Amiibo not detected:
- Ensure the Amiibo is placed correctly over the NFC sensor.
- Verify that the game or Switch system settings have NFC enabled.
9. Мушаххасоти
| Хусусият | Тафсилот |
|---|---|
| Рақами модел | Назоратчӣ |
| Мутобиқати | Nintendo Switch, Switch OLED, Switch Lite, PC (Steam) |
| Пайвастшавӣ | Бесим (Bluetooth), Симӣ (USB-C) |
| Иқтидори батарея | 600mAh (Баркароршаванда) |
| Порти пуркунандаи барқ | USB-C |
| Хусусиятҳои махсус | NFC, Turbo, Adjustable Vibration, RGB Lighting, Wake Up Function, 6-Axis Gyro Motion Control |
| Андозаҳо | 16.7 x 15.6 x 6.6 см (тақрибан) |
| Вазн | 280 г (тақрибан) |
10. Кафолат ва дастгирӣ
For warranty information or technical support, please refer to the official IINE webсайт ё бевосита бо хадамоти муштариёни худ тамос гиред. Квитансияи хариди худро ҳамчун далели харид нигоҳ доред.
For further assistance, you may visit the IINE Store on Amazon: IINE Official Store


