1. Муқаддима
The Stinger HORIZON10 is a state-of-the-art 10.1-inch infotainment system designed specifically for Jeep Wrangler JK models (2011-2018). It offers a seamless upgrade to your vehicle's audio and navigation capabilities, featuring a high-definition, weather-resistant touchscreen and advanced connectivity options.
Хусусиятҳои асосӣ:
- 10.1" HD IP65 Weather-Resistant Touchscreen: Clear visuals with anti-glare and anti-fingerprint protection.
- бесими Apple CarPlay ва Android Auto: Seamless smartphone integration for navigation, calls, messages, and music.
- On-Screen Vehicle Information & Off-Road Gauges: Customizable displays for transfer case, latitude/longitude, altitude, steering angle, and more.
- Мутобиқати Plug-and-Play: Designed for easy connection to existing vehicle wiring harnesses.
- Bluetooth 4.2 A2DP & Wi-Fi Connectivity: Dual phone connections for hands-free calling and music streaming.
- Вурудҳои сершумор: 2 USB-A, 1 USB-C (with 3A charging), 1 HDMI, and 4 AHD/CVBS camera inputs.
- SiriusXM-Ready & Built-In HD Radio Tuner: Access to a wide variety of audio content (SiriusXM Tuner sold separately).
- Хусусиятҳои аудиои пешрафта: On-screen control for AC DM Smart app, 4.5 Vrms & 8ch RCA outputs, Toslink (optical) audio output, 15-band adjustable EQ, and built-in crossover.
2. Дар қуттӣ чӣ мавҷуд аст
- 10.1-inch touchscreen display infotainment system
- RadioPro Interface for Jeep Wrangler JK (2011-2018)
- Jeep Wrangler JK flush-mount radio dash kit (SRK-JK11HX)
- Antenna adapters for satellite and AM/FM radio
- USB/HDMI hub
- PAC-LINK communication module
- Complete Plug-n-Play installation harness
- SiriusXM Adaptor (retains factory-installed SiriusXM antenna)
Note: SiriusXM Tuner sold separately (SXV300V1).
3. Насб ва насб
Ин бахш маълумоти умумӣ медиҳадview of the installation process. For detailed visual instructions, please refer to the official installation video below.
Воситаҳои зарурӣ:
- Drill with Phillips Bit
- Васлаки 7мм
- Васлаки 10мм
- Nylon Pry Tool
- Crimpers
- Буришҳои ҳамвор
- Корди ришдор
- Алоқаи Zip
Қадамҳои насбкунӣview:
- Мошинро тайёр кунед: Begin by removing the knee bolster below the steering column. Lower the steering wheel to ease access.
- Remove Dash Components: Remove the two 7mm bolts behind the knee bolster. Carefully remove the window control panel/storage bin and disconnect its harness. Remove the 7mm bolt from this opening. Remove the tray liner from the top of the dash and its 7mm bolt.
- Access Radio: Gently pull the upper dash panel forward to unclip it and remove it from the vehicle. Remove the four 7mm bolts securing the factory radio.
- Disconnect Factory Radio: Pull out the head unit and disconnect all harnesses and antenna connectors.
- Climate Control Panel: Shift the gear selector to neutral (with ignition on but engine off) for clearance. Pull the climate control panel towards the rear of the vehicle to disengage clips and disconnect all connectors.
- Uconnect Module (if applicable): For vehicles with factory Uconnect, remove the two 7mm screws securing the Uconnect module behind the climate control panel. Unplug the factory USB cable.
- USB Adapter & Routing: Plug the factory USB cable into the included USB UN3 adapter. Route the USB-A end up through the dash to the radio opening. Reinstall the Uconnect module.
- Assemble Radio Module: Attach the two metal side brackets to the radio module using M5x10 Phillips screws. If installing iGO navigation, insert the micro SD card into the slot.
- Connect Harnesses: Connect the main vehicle harness (2-pin, 14-pin, 8-pin audio) to the Horizon adapter harness. Connect the PAC-Link module. Connect the radio harness, power harness, and vehicle harness to the radio replacement module. Connect the audio harness (ampтаснифшуда ё ғайриamplified) and expansion port harness.
- Mount Modules: Attach the radio replacement module to the mounting bracket using zip ties. Secure the PAC-Link module to the mounting panel. Attach the module bracket to the side brackets using coarse thread screws. Mount the support bracket to the top of the radio module using M4x4 screws, ensuring correct orientation. Insert the clip-on nut if no factory support bracket is present.
- Antenna & Data Connections: Connect the antenna adapter. Connect the data cable (for Enlighten products) and camera inputs (AV In harness). Connect the RCA pre-out harness for external amplifiers. Connect the main power connector.
- GPS & Microphone: Connect the GPS antenna. If installing the optional external microphone, attach the windshield and slide the microphone into a supplied bracket. Route the microphone's 3.5mm connector through the dash to the radio opening. Secure excess cabling with zip ties.
- T-Harness Connection: Connect the appropriate T-harness to the CAN bus connection point under the steering column. Route the T-harness cable to the radio opening.
- Reassemble Climate Control: Reinstall the climate control panel, ensuring USB cables are routed through the lower opening to the radio opening. Reconnect all connectors and snap the panel back into place.
- Final Radio Assembly: Rest the radio assembly on top of the dash. Connect the GPS antenna, USB-C, USB-A, and AM/FM antenna adapter. Connect any Enlighten product controllers, camera inputs, and RCA pre-outs. Connect the data connection from the T-harness. Plug the vehicle connector into the main harness. Connect the LVDS cable to the radio module.
- Prepare Display Panel: Remove the half-moon shaped tabs from the display panel using flush cutters and a razor knife for a smooth finish.
- Attach Display to Panel: Attach the display to the mounting panel using M4x12 screws. Install rubber plugs into the innermost mounting holes for weather resistance.
- Connect Display to LVDS: Plug the LVDS cable into the back of the display, ensuring the tab faces up. Route the cable through the split rubber ring.
- Install Wire Cover: Align the wire cover tabs with the notches on the display and place the cover. Slide the cover down to expose the screw hole and secure it with the supplied M2.6x6.5 screw.
- Mount Display: Attach the display assembly to the radio opening by aligning the locating ribs and pushing inward until it snaps into place. Tighten the four screws.
- Install Front Frame: Hook the front frame at the top, pull it towards you, and swing it down to snap the sides and bottom into position.
- Final Reassembly: Reinstall the 7mm bolt on top of the dash and replace the rubber tray liner. Reinstall the two 7mm bolts below the steering column. Slide the black metal plate into position and reinstall the two 10mm bolts. Reinstall the knee bolster panel.
Видео насб:
Description: Official installation guide for the Stinger HORIZON10 in a Jeep Wrangler JK, detailing step-by-step procedures for component removal, wiring, and reassembly.
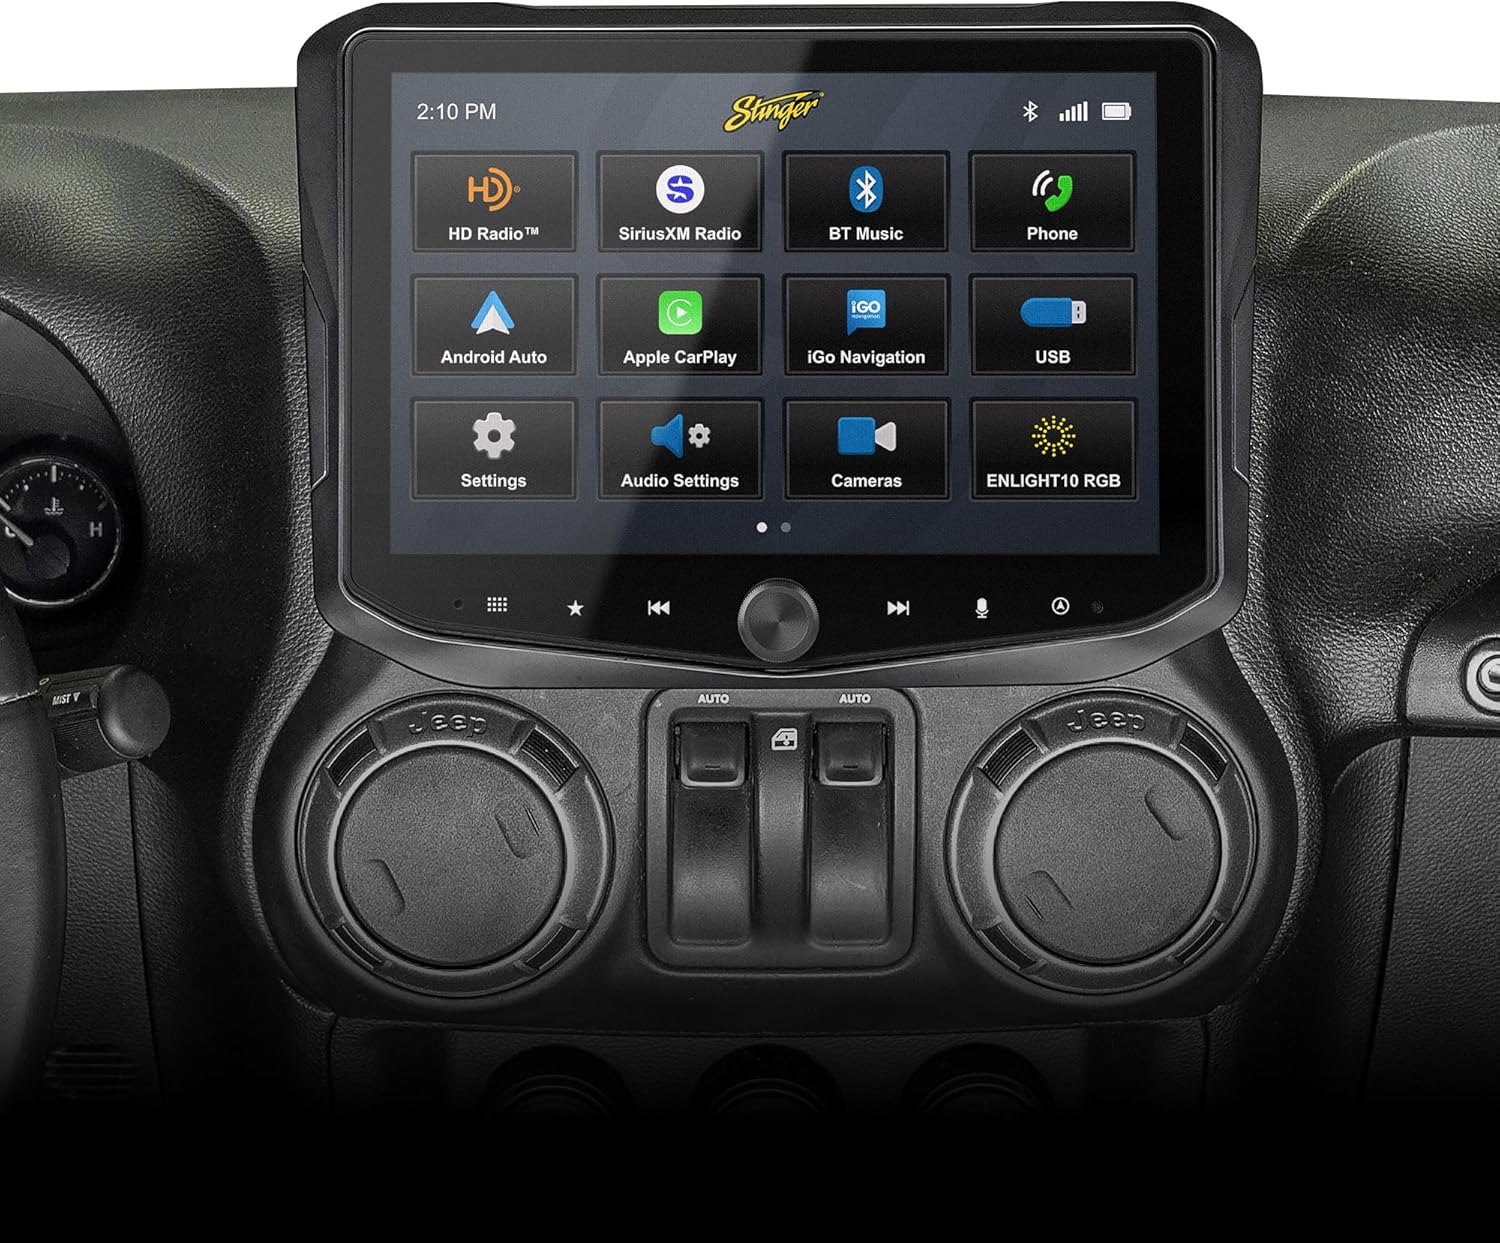
Description: The Stinger HORIZON10 infotainment system seamlessly integrated into a Jeep Wrangler JK dashboard, showcasing its large touchscreen display and intuitive interface.

Description: A side-by-side comparison showing the factory Jeep Wrangler JK radio above and the modern Stinger HORIZON10 infotainment system installed below, highlighting the significant upgrade in display size and functionality.

Тавсиф: Муфассал view of the Stinger HORIZON10 touchscreen, pointing out its anti-glare and anti-fingerprint protective film, weather-resistant optically bonded LCD panel, capacitive touch panel buttons, and machined aluminum anodized knob.
4. Дастурҳои истифодабарӣ
The Stinger HORIZON10 offers a user-friendly interface designed for intuitive control and enhanced driving experience.
Амалиёти асосӣ:
- Интерфейси экрани сенсорӣ: Navigate through menus and applications by tapping, swiping, and pinching on the HD touchscreen.
- Назорати ҷисмонӣ: Utilize the machined aluminum knob for volume control and other functions, along with capacitive touch buttons for quick access to main features.
- Экрани хонагии фармоишӣ: Personalize the background image and rearrange Home screen icons for easier access to your most used functions.
Пайвастшавӣ:
- CarPlay бесим ва Android Auto: Connect your iPhone or Android phone wirelessly for seamless access to navigation, calls, messages, and music. Ensure your phone's Bluetooth and Wi-Fi are enabled.
- Bluetooth 4.2: Pair your phone for hands-free calling and audio streaming. Supports dual phone connections.
- Вурудҳои USB: Use the USB-A and USB-C ports for wired CarPlay/Android Auto, media playback, and fast 3A phone charging.
- Вуруди HDMI: Connect external video sources for entertainment.
Navigation & Vehicle Data:
- iGO Navigation (Optional): If the iGO SD card is installed, access reliable offline maps directly from the unit.
- On-Screen Vehicle Information: Monitor real-time vehicle data including transfer case, current position (latitude/longitude), altitude, steering angle, and more, enhanced for off-road use.
- onX GPS Navigation (Trial): Enjoy a free 3-month trial of the onX GPS navigation off-roading map app (registration required on Stinger webсайт).
Audio & Media:
- HD Radio Tuner: Enjoy high-quality AM/FM radio reception.
- SiriusXM-Ready: Integrate a SiriusXM tuner (sold separately) for satellite radio access.
- Хусусиятҳои аудиои пешрафта: Utilize the 15-band adjustable EQ, 6 user EQ presets, and built-in crossover (HPF & LPF) for personalized sound. Control AC DM Smart app on-screen.
- Натиҷаҳои RCA: 4.5 Vrms & 8ch RCA outputs with subwoofer control for connecting external ampосебдидагон.
- Toslink (Optical) Audio Output: Provides a 48 kHz variable optical audio output for high-fidelity sound systems.
Интегратсияи камера:
- 4 Camera Inputs: Supports both AHD 720p and CVBS 480p cameras for front, rear, and blind spot views.
Назорати равшании RGB:
- ENLIGHT10 RGB: On-screen control for ENLIGHT10 RGB dynamic LED lighting (if installed).
Хусусиятҳо тамом шудандview Видео:
Description: A brief overview of the key features of the Stinger HORIZON10 infotainment system, including its weather-resistant screen, audio enhancements, and connectivity options.

Description: The Stinger HORIZON10 screen showing various on-screen vehicle information gauges, including engine run time, oil pressure, fuel level, and engine load, providing valuable insights at a glance.

Description: The Stinger HORIZON10 infotainment system displaying the Apple CarPlay interface, emphasizing its wireless connectivity for iPhone users.
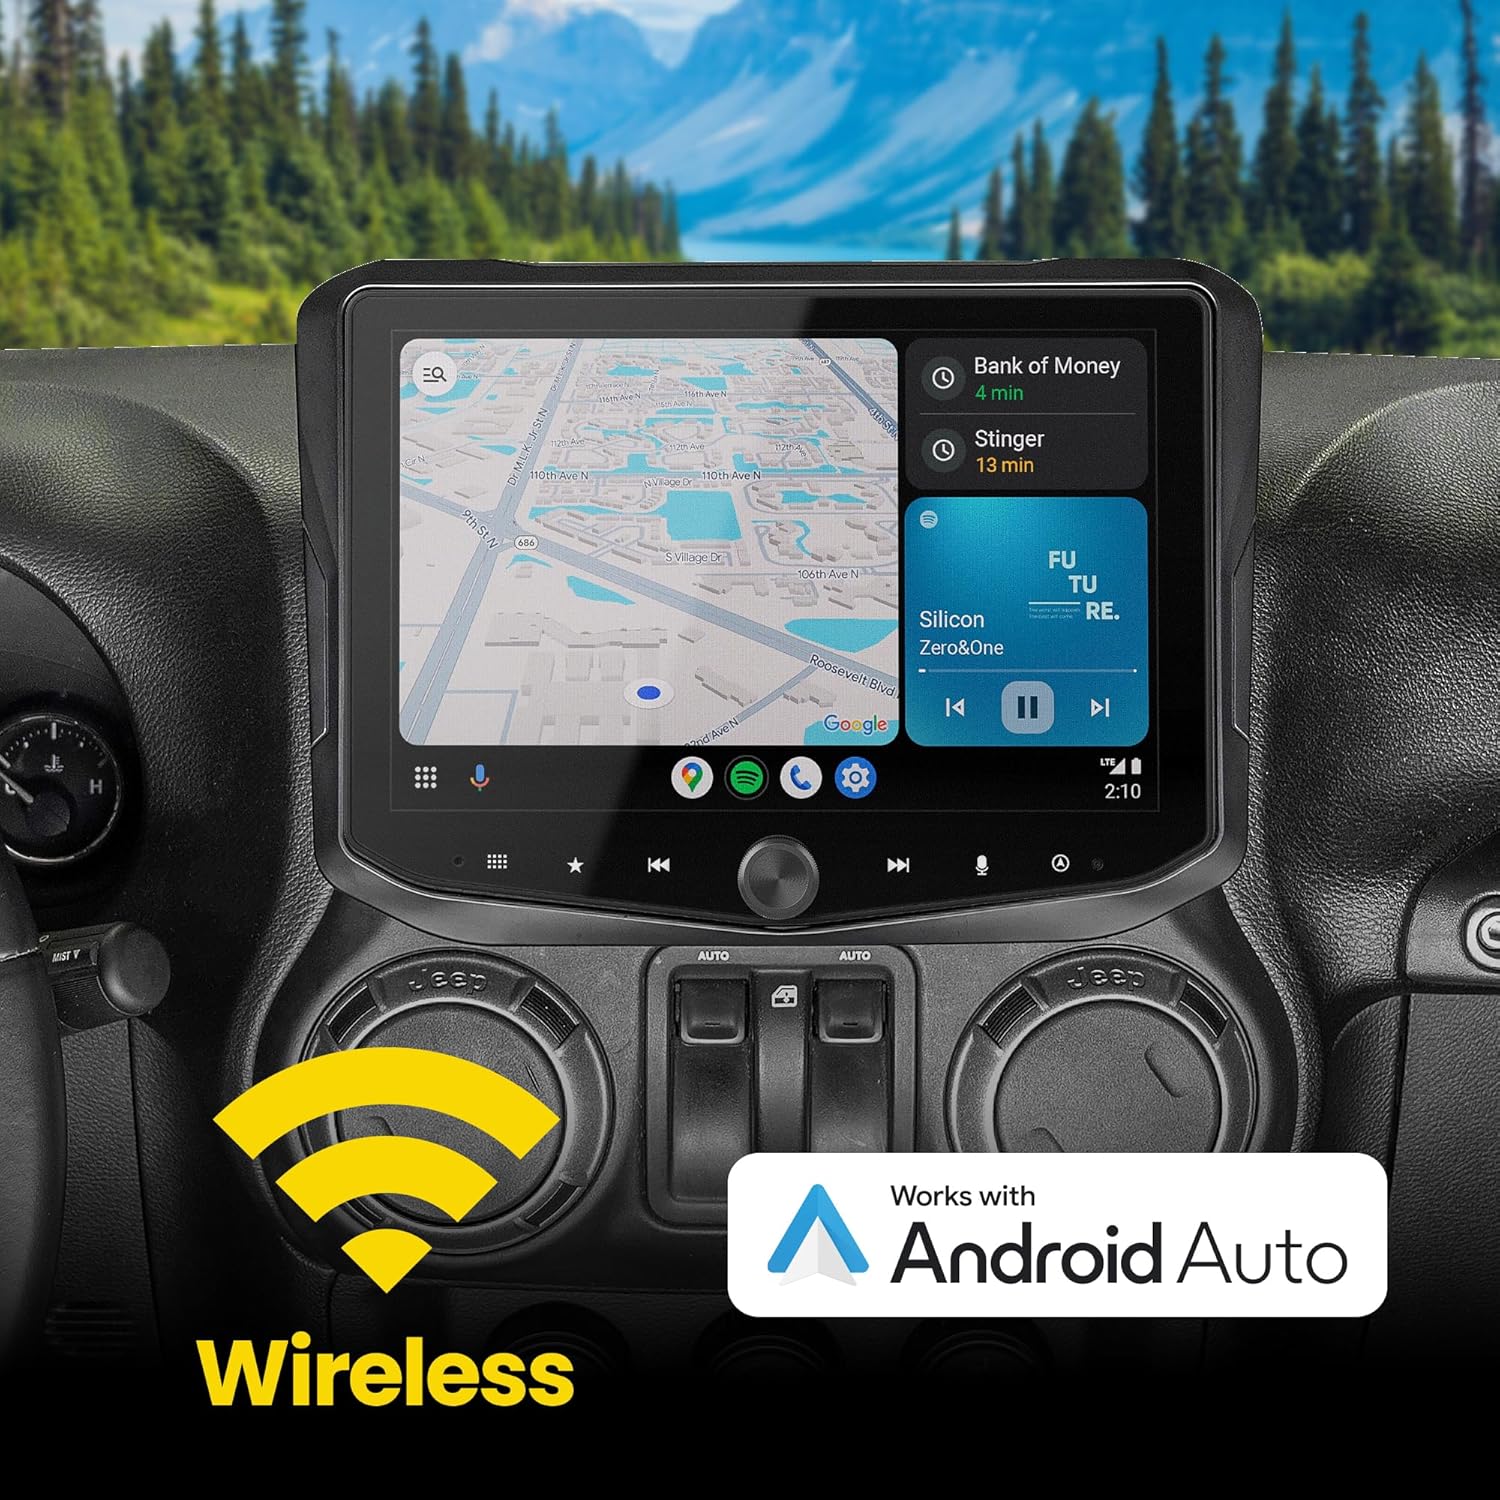
Description: The Stinger HORIZON10 infotainment system displaying the Android Auto interface, highlighting its wireless connectivity for Android phone users.
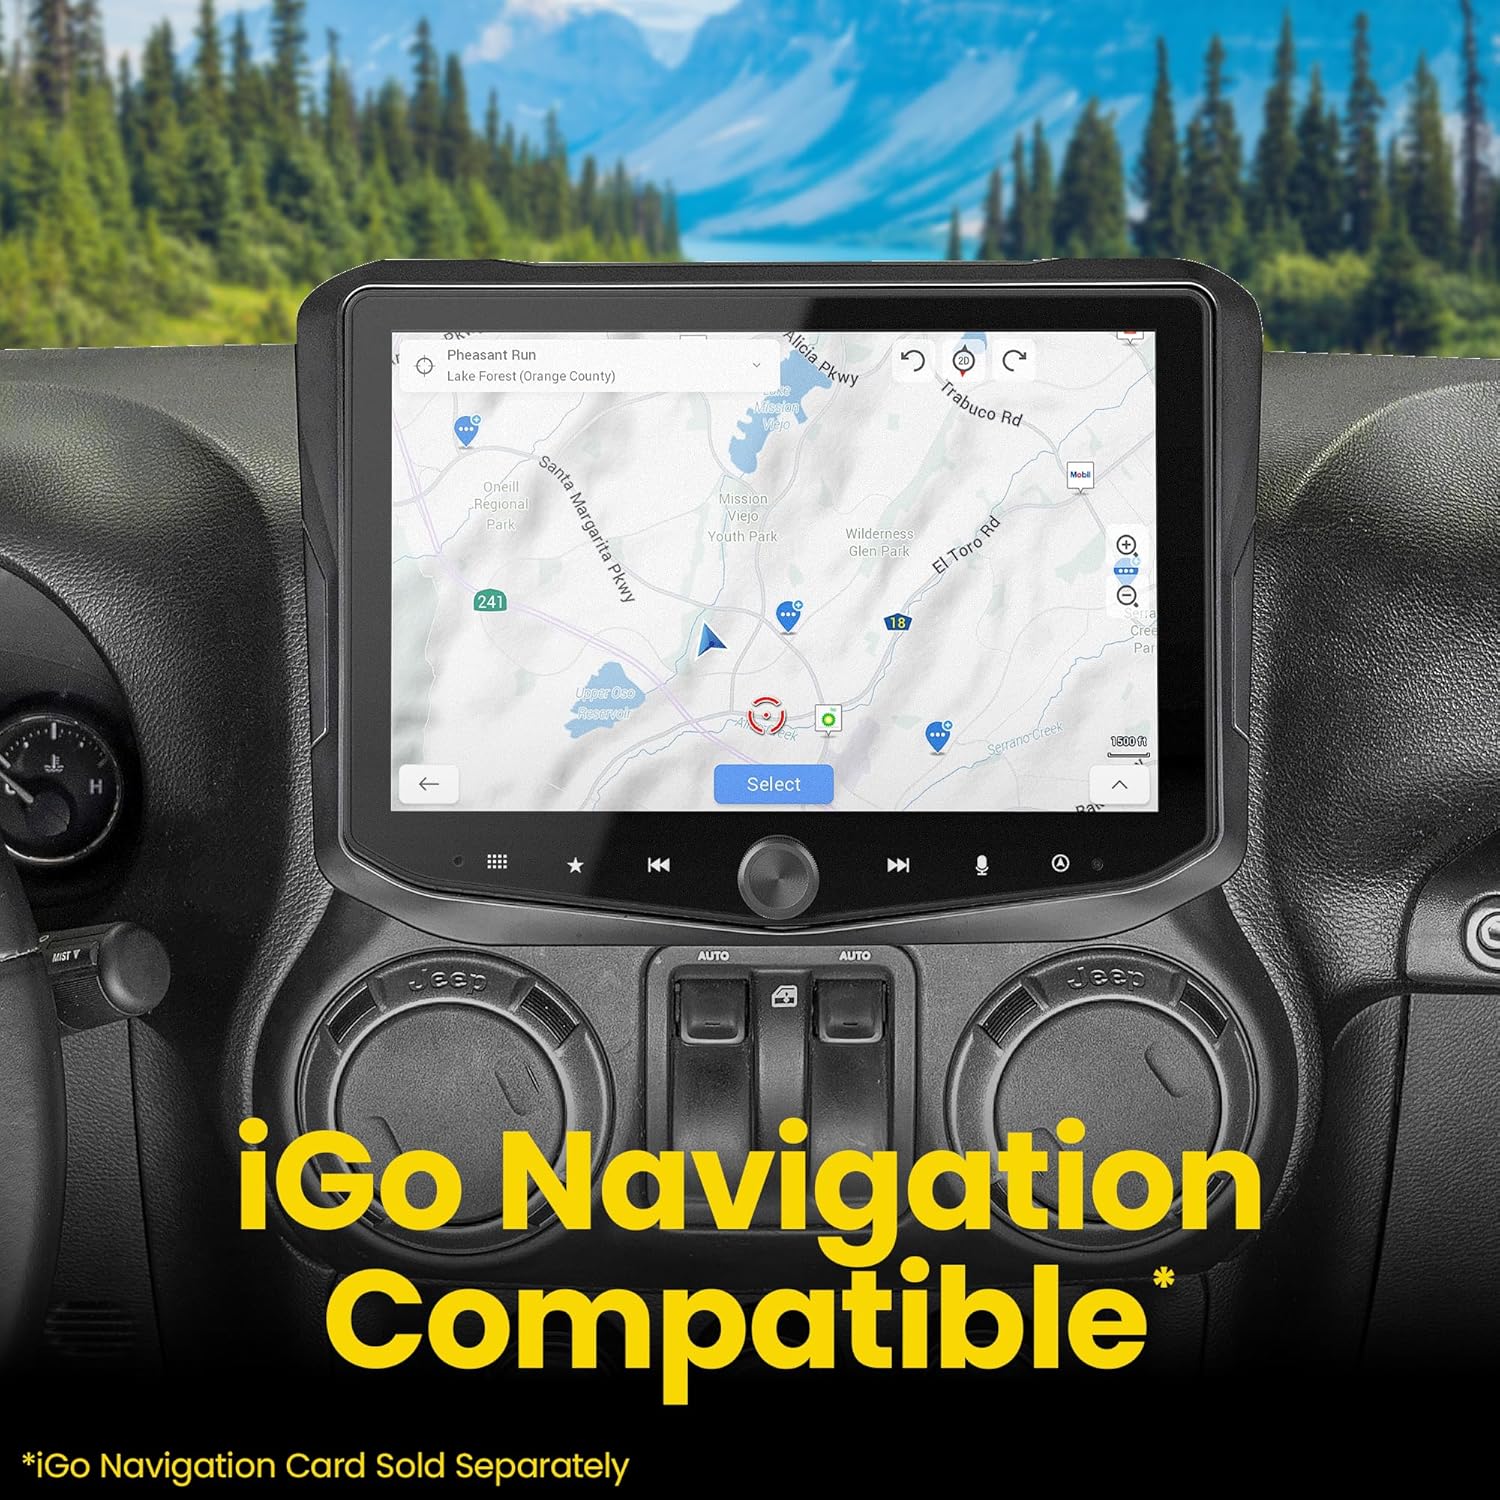
Description: The Stinger HORIZON10 screen showing a navigation map, indicating its compatibility with iGO Navigation (SD Card Sold Separately).
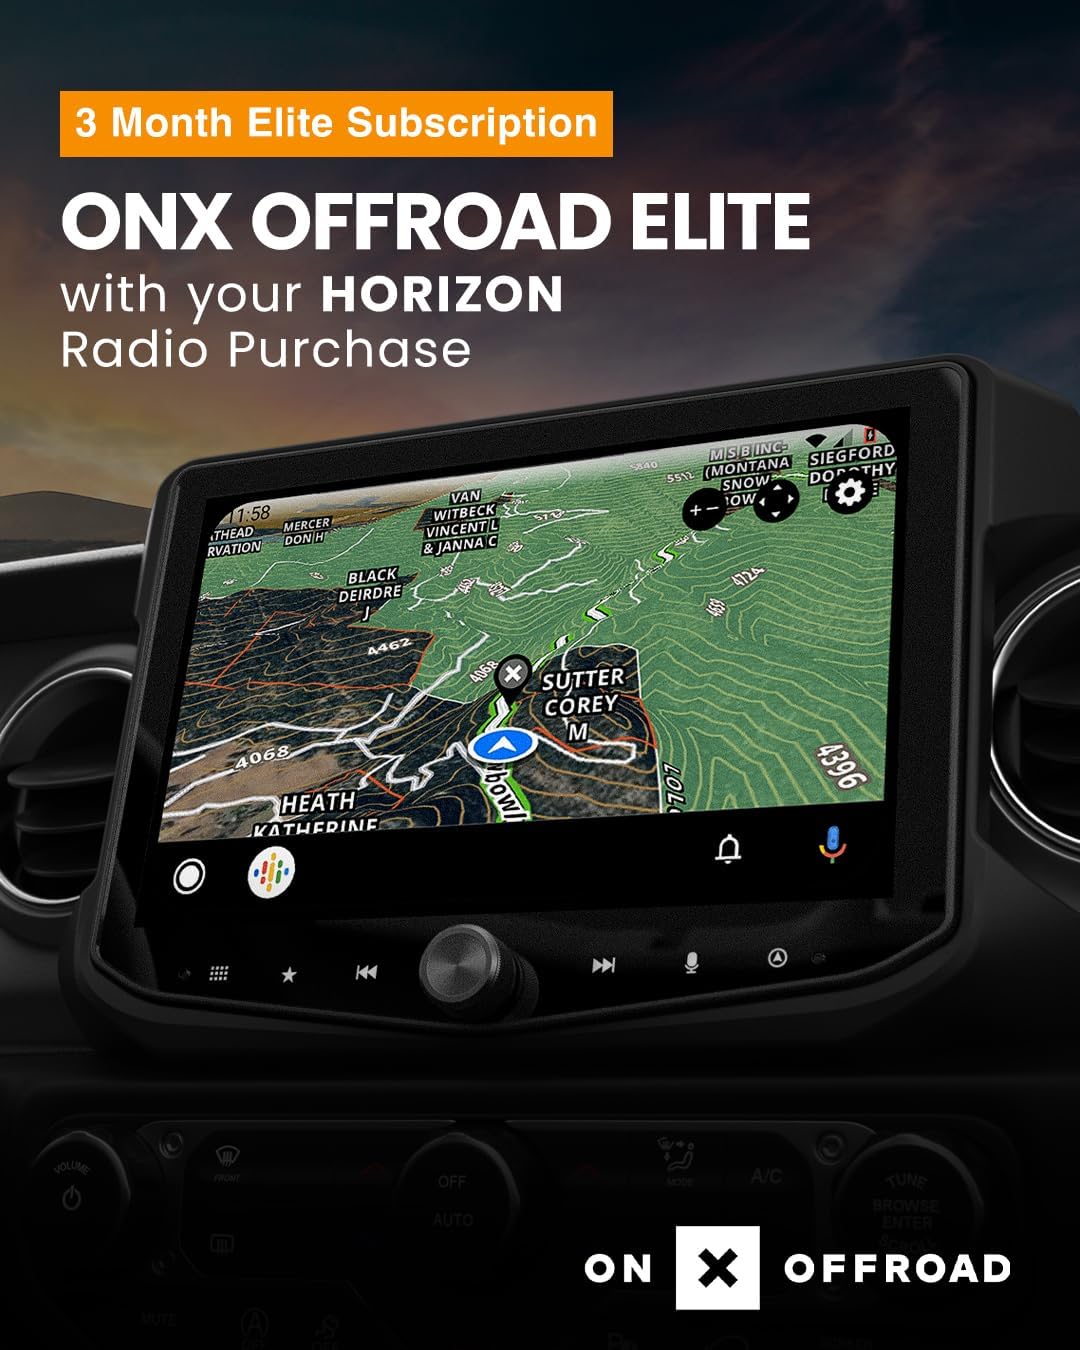
Description: An image promoting a 3-month Elite Subscription to ONX Offroad with the purchase of a Stinger HORIZON10 Radio, showcasing its off-road mapping capabilities.
5. Нигоҳдорӣ
Барои таъмини дарозумрӣ ва кори беҳтарини Stinger HORIZON10-и шумо, ин дастурҳои нигоҳдориро риоя кунед:
- Тоза кардани экран: Use a soft, lint-free cloth and a screen-safe cleaner to wipe the touchscreen. Avoid abrasive materials or harsh chemicals that could damage the anti-glare and anti-fingerprint film.
- Муқовимати обу ҳаво: The 10.1" HD touchscreen is IP65 weather-resistant, offering protection against dust and moisture. However, the radio chassis is not IP-rated. Avoid direct exposure of the chassis to water or excessive moisture.
- Навсозии нармафзор: Periodically check the Stinger website for firmware updates to ensure you have the latest features and performance enhancements. For iGO Navigation map updates, an SD card (sold separately) may be required.
- Нигоҳубини умумӣ: Keep the unit free from excessive dust and debris. Ensure all connections are secure and free from corrosion.
6. Баррасии мушкилот
If you encounter issues with your Stinger HORIZON10, refer to the following common troubleshooting tips:
- Не қудрат: Check all power connections to ensure they are securely plugged in. Verify vehicle battery voltage. If the unit loses connection with the CAN bus system, a fuse pull (under the hood) might be necessary to reset.
- Аудио нест: Check speaker connections and RCA outputs. Ensure the correct audio source is selected. Verify amplifier connections if aftermarket amplifiers are installed.
- CarPlay/Android Auto Connectivity Issues: Ensure your smartphone's Bluetooth and Wi-Fi are enabled. Try forgetting the device on both the phone and the HORIZON10, then re-pair. Check USB cable integrity for wired connections.
- Идоракунии чархи руль кор намекунад: Verify the T-harness connection to the vehicle's CAN bus system. Ensure the PAC-Link module is correctly connected and programmed.
- Screen Unresponsive/Frozen: Try restarting the vehicle. If the issue persists, a hard reset may be required (refer to the full manual for specific reset procedures).
- Қабули сусти радио: Check the AM/FM antenna adapter connection. Ensure the antenna is properly installed and not obstructed.
- iGO Navigation Issues: Ensure the iGO SD card is properly inserted and not corrupted. Map updates may resolve navigation inaccuracies.
For persistent issues or advanced troubleshooting, please contact STINGER customer support.
7. Мушаххасоти
| Аттрибут | Арзиш |
|---|---|
| Бренд | СТИНГЕР |
| Рақами модел | RB10JK11X |
| Андозаи экран | 10.1-дюйм |
| Рейтинги IP | IP65 (Touchscreen) |
| Технологияи пайвастшавӣ | Bluetooth, Wi-Fi, USB, HDMI |
| Навъи назораткунанда | Смартфон, экрани сенсорӣ |
| Хусусиятҳои махсус | Touchscreen, Android Auto, Built-In Bluetooth, Apple CarPlay, Built-In Wi-Fi |
| Дастгоҳҳои мувофиқ | iPhone, Android Phone, Smartphone |
| Навъи пайвасткунанда | USB-A, USB-C, HDMI |
| Ҳолати баромади аудио | Стерео |
| Шумораи каналҳо | 8 |
| Хидматҳои интернетии дастгирӣшаванда | SiriusXM |
| Вазни ашё | 12.57 фунт |
| Андозаҳои бастаҳо | 15 x 14.5 x 11.75 инч |
| Кишвари аслӣ | Хитой |
8. Кафолат ва дастгирӣ
STINGER products are designed in the USA and manufactured with quality in mind. For specific warranty details, please refer to the warranty card included with your product or visit the official STINGER webсайт.
Нақшаҳои муҳофизатӣ:
- Нақшаи ҳимояи 2-сола (ихтиёрӣ)
- Нақшаи ҳимояи 3-сола (ихтиёрӣ)
- Complete Protect (Monthly, Optional)
For technical assistance, product inquiries, or warranty claims, please contact STINGER customer support through their official channels.


