1. Муқаддима
This manual provides comprehensive instructions for the safe and effective use of the Creality Laser Rotary Roller Pro. This Y-axis rotary chuck is designed to expand the capabilities of Creality series laser engravers, enabling precise engraving on cylindrical and irregularly shaped objects. Please read this manual thoroughly before operation to ensure proper setup and usage.
2. Мундариҷаи баста
Боварӣ ҳосил кунед, ки ҳамаи ҷузъҳои дар поён овардашуда ба бастаи шумо дохил карда шудаанд:
- 1x Creality Laser Rotary Roller Pro
- 4x 56mm Risers (M6 Screw compatible)
- 8x 28mm Risers (M6 Screw compatible)
- 1x Professional Goggles (for 180nm-540nm wavelength)
- 1x Connection Cable (compatible with Falcon/Falcon2/Falcon2 Pro/Falcon2 Pro S series machines)
Шарҳ:
- The connection cable for A1 series machines is typically included with the A1 series machine package and is not part of this Rotary Roller Pro package. Users connecting to A1 series machines should use the specific cable provided with their A1 machine.

Image: Contents of the Creality Laser Rotary Roller Pro package, showing the main unit, various risers, safety goggles, and examples of items that can be engraved.
3. Маълумот оид ба бехатарӣ
Always prioritize safety when operating laser engraving equipment. The included professional goggles are designed to protect your eyes from laser harm within the 180nm-540nm wavelength range. Ensure you wear these goggles, or equivalent certified laser safety eyewear, at all times during laser operation.

Image: Professional laser safety goggles, essential for eye protection during laser engraving operations.
4. Маҳсулот ба охир расидview
The Creality Laser Rotary Roller Pro features a robust all-metal construction for durability and stability. Its innovative 3-in-1 adjustable jaws provide versatility for engraving a wide range of object shapes and sizes.
4.1 Multifunctional Adjustable Jaws
The rotary roller is equipped with versatile jaws to accommodate various object types:
- Clamp from the Outside: Suitable for cylindrical objects with a diameter of 1-110mm, such as cans or thermos pots.
- Prop up from the Inner Side: Ideal for cylindrical objects with a diameter of 25-75mm, like red wine glasses.
- Hex Stud: Designed for spheres with a diameter of 10-130mm, or rings and bracelets with a diameter of 15-100mm.

Image: The Rotary Kit Pro demonstrating its ability to clamp a wine glass for engraving curved surfaces.

Тасвир: Муфассал views of the rotary roller's jaws, illustrating external clamping for larger cylinders and internal propping for delicate items like wine glasses.

Image: The rotary roller configured with hex studs to securely hold spherical objects and rings for precise engraving.
4.2 Detail Features
- Rotary Adjustment: Allows for precise control over the rotation and positioning of the object.
- Болишти нарми зиддилағзиш: Ensures secure gripping of objects, preventing slippage during engraving.
- One-handed Clamping: Designed for ease of use, allowing quick and secure clamping of items.
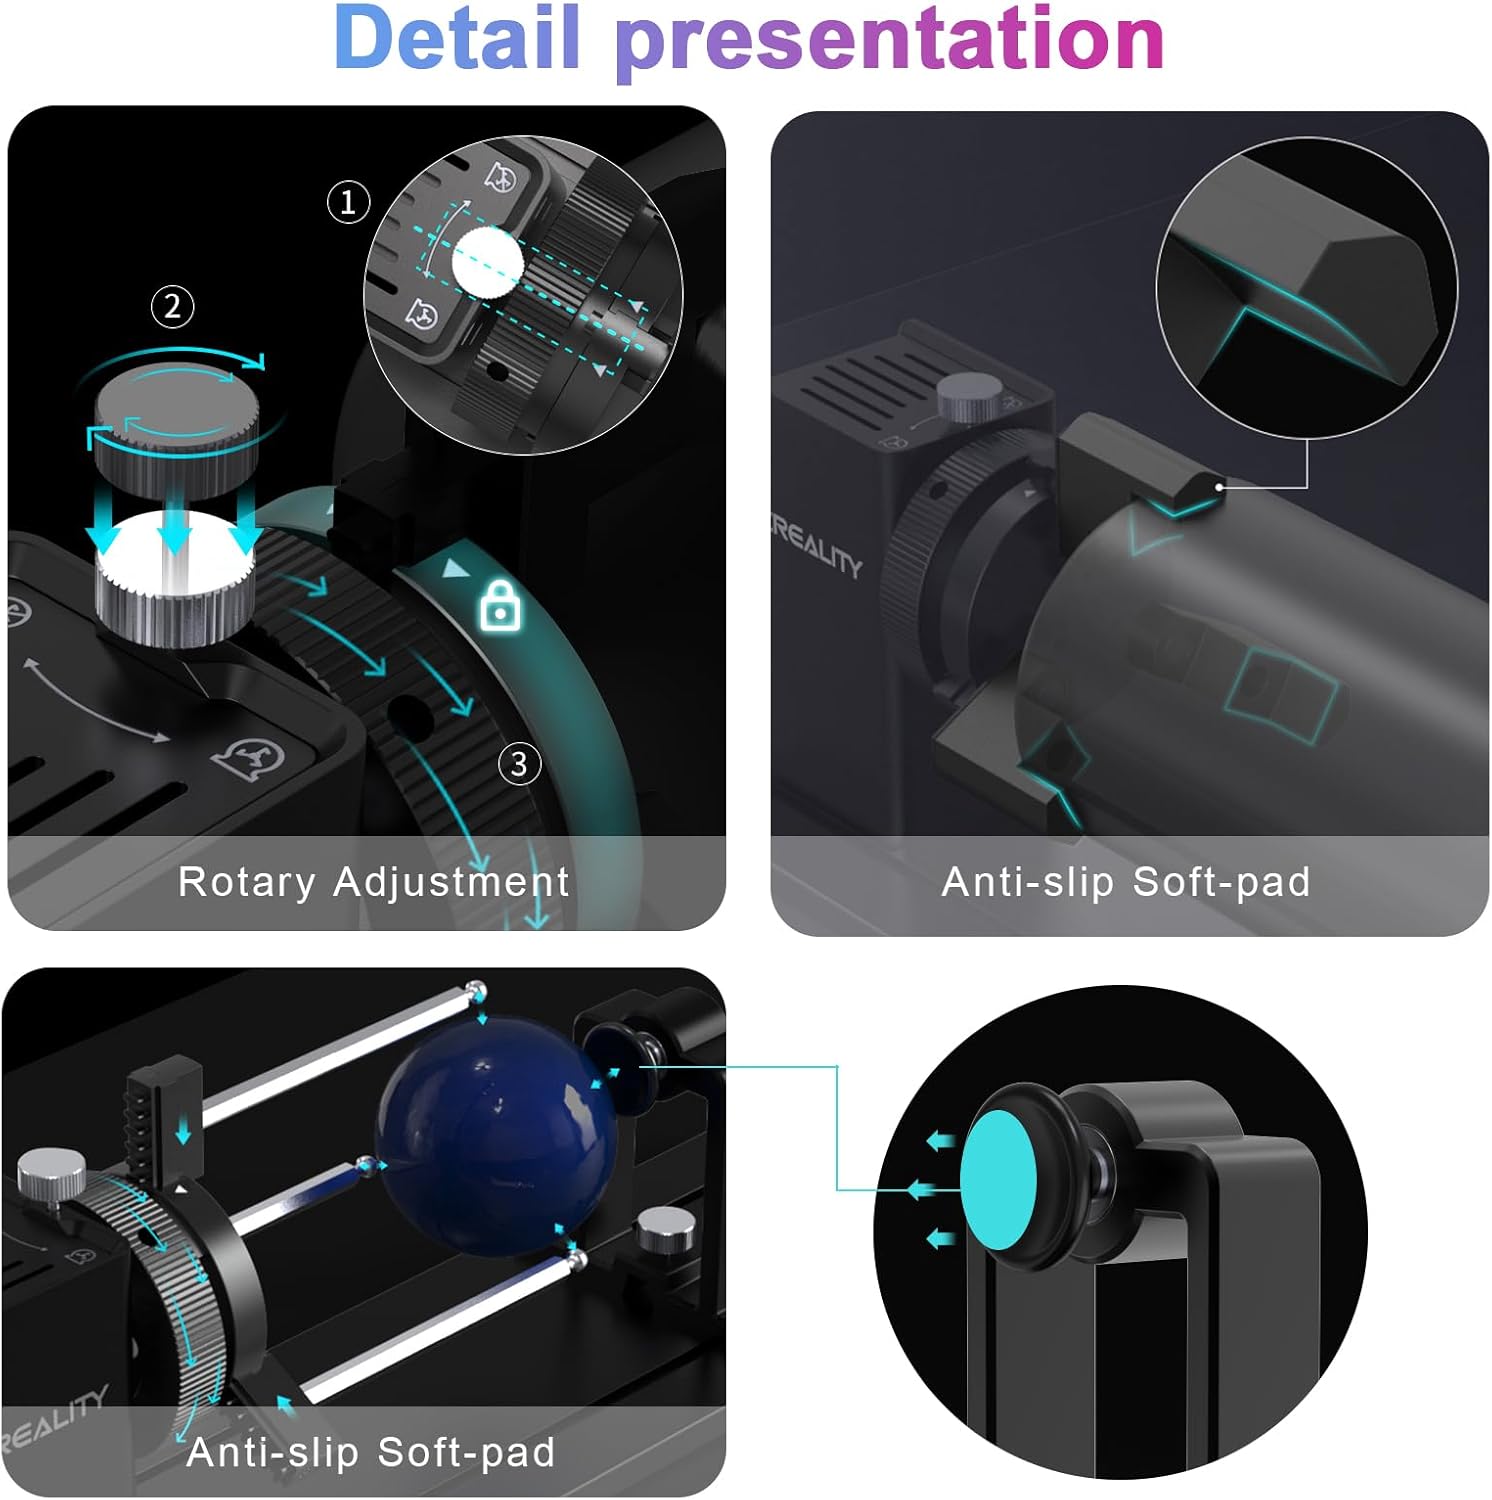
Тасвир: Наздик views highlighting the rotary adjustment mechanism, anti-slip soft-pads for secure object handling, and the hex stud in use.
5. Дастурамал оид ба насб
The Rotary Kit is designed for straightforward setup. No complex assembly is required as the external clamp type is pre-installed by default.
5.1 General Setup Steps
- Remove the Bottom Tray: If your laser engraver has a bottom tray, remove it to create space for the rotary roller and risers.
- Install Risers: Based on the size of the item you intend to engrave, install the appropriate risers (56mm or 28mm) to elevate your laser engraver. These risers are connected via M6 screws and are suitable for Creality Falcon A1 series and other laser engraving machines with M6 standard feet.
- Кабелҳоро пайваст кунед: Connect the provided connection cable from the rotary roller to the Y-axis motor port of your Creality laser engraver.
- Adjust the Jaws: Place your object into the rotary roller and adjust the jaws to tighten it securely. Ensure the object is centered and stable.

Image: Visual guide for setting up the rotary roller, including tray removal, riser installation, cable connection, and jaw adjustment.
5.2 Riser Information
The package includes 4 pieces of 56mm risers and 8 pieces of 28mm risers. These allow for different height adjustments to accommodate various engraving targets, increasing the working space under the laser engraver for larger items.

Image: Illustration of the included risers (56mm and 28mm) and their M6 screw compatibility, specifically for the Falcon A1 series.
6. Дастурҳои истифодабарӣ
Once the Rotary Roller Pro is physically connected to your laser engraver:
- Фаъол: Start your laser engraving machine.
- Пайвасти нармафзор: Connect your laser engraver to your computer and open the operating software (e.g., LightBurn, LaserGRBL, Creality Laser software).
- Танзимоти нармафзор: It is crucial to adjust the relevant settings and parameters within your laser engraving software to recognize and properly control the rotary axis (Y-axis). Refer to your software's documentation for specific rotary setup procedures. This typically involves enabling the rotary axis, setting the correct steps per rotation, and defining the object's diameter.
- Test Engraving: Before performing a final engraving, conduct a low-power test run on a similar scrap material to verify settings and object stability.
7. Нигоҳдорӣ
To ensure the longevity and optimal performance of your Creality Laser Rotary Roller Pro:
- Тозакунӣ: Regularly clean the rotary roller, especially the jaws and moving parts, to remove dust, debris, and engraving residue. Use a soft, dry cloth. Avoid abrasive cleaners or solvents.
- Молидани: Periodically check for smooth movement of the adjustable jaws and rotary mechanism. Apply a small amount of light machine oil if any stiffness is observed, ensuring not to over-lubricate.
- Нигоҳдорӣ: When not in use, store the rotary roller in a clean, dry environment away from direct sunlight and extreme temperatures.
8. Баррасии мушкилот
If you encounter issues with your Creality Laser Rotary Roller Pro, consider the following:
- Rotary Not Moving/Responding:
- Ensure the connection cable is securely plugged into both the rotary roller and the Y-axis motor port of the engraver.
- Verify that the rotary axis is enabled and correctly configured in your laser engraving software. Check steps per rotation and other relevant parameters.
- Confirm that the laser engraver itself is powered on and communicating with the computer.
- Engraving Distortion/Slippage:
- Боварӣ ҳосил кунед, ки объект боэътимод баста шудаастamped and centered in the rotary jaws.
- Check that the anti-slip soft-pads are clean and providing adequate grip.
- Reduce engraving speed or acceleration settings in your software if the object is slipping or losing position during rotation.
- Verify that the object's diameter is correctly entered in the software.
- Incompatibility with A1 Series:
- Remember that A1 series machines require their specific connection cable, which is not included with the Rotary Roller Pro. Ensure you are using the correct cable.
For further assistance, please refer to the support resources provided by Creality or consult your laser engraver's specific documentation.
9. Мушаххасоти
| Хусусият | Тафсилот |
|---|---|
| Product Dimensions (Rotary Kit Pro) | 360*122*100mm (approx. 14.17 x 4.8 x 3.94 inches) |
| Product Weight (Rotary Kit Pro) | 1.95 кг (тақрибан 4.3 фунт) |
| Safety Goggles Dimensions | 154*55*55мм |
| Safety Goggles Weight | 0.5 кг |
| 56mm Risers Weight (4 pcs) | 0.098 кг |
| 28mm Risers Weight (8 pcs) | 0.111 кг |
| Cylindrical Object Diameter (Outside Clamp) | 1-110мм |
| Cylindrical Object Diameter (Inner Prop) | 25-75мм |
| Spherical Object Diameter (Hex Stud) | 10-130мм |
| Диаметри ҳалқа/дастбанд (шакли шашкунҷа) | 15-100мм |
| Мутобиқати | Creality series laser engravers (Falcon/Falcon2/Falcon2 Pro/Falcon2 Pro S, Falcon A1 series with specific cable) |

Image: Summary of product parameters including dimensions and weights for the rotary kit and accessories.
10. Кафолат ва дастгирӣ
Барои маълумоти кафолат ва дастгирии техникӣ, лутфан ба Creality расмии муроҷиат кунед website or contact Creality customer service directly. Keep your purchase receipt as proof of purchase for warranty claims.


